Buick Encore: Diagnostic information and procedures
SPECIFICATIONS
FASTENER TIGHTENING SPECIFICATIONS
Fastener Tightening Specifications
.jpg)
BRAKE COMPONENT SPECIFICATIONS
Brake Component Specifications
.jpg)
BRAKE SYSTEM SPECIFICATIONS
Brake System Specifications
.jpg)
SCHEMATIC WIRING DIAGRAMS
HYDRAULIC BRAKE WIRING SCHEMATICS (ENCORE)
Hydraulic Brakes
.jpg)
Fig. 1: Hydraulic Brakes
HYDRAULIC BRAKE WIRING SCHEMATICS (Encore)
Hydraulic Brakes
.jpg)
Fig. 2: Hydraulic Brakes
DIAGNOSTIC INFORMATION AND PROCEDURES
DIAGNOSTIC CODE INDEX
.jpg)
DTC C0267: Low brake fluid indicated
Diagnostic Instructions
- Perform the Diagnostic System Check - Vehicle prior to using this diagnostic procedure.
- Review Strategy Based Diagnosis for an overview of the diagnostic approach.
- Diagnostic Procedure Instructions provides an overview of each diagnostic category.
DTC Descriptor
DTC C0267
Low Brake Fluid Indicated
For symptom byte information refer to Symptom Byte List .
Diagnostic Fault Information
.jpg)
Circuit/System Description
The brake fluid level switch monitors the level of the brake fluid in the brake fluid reservoir. When the electronic brake control module sees low brake fluid level, the DTC is set.
Conditions for Running the DTC
Ignition ON.
Conditions for Setting the DTC
Low brake fluid level is detected for 8 s.
Action Taken When the DTC Sets
- The electronic brake control module disables the traction control and stability control for the duration of the ignition cycle.
- The traction control/stability control-active indicator turns ON.
- The brake warning indicator turns ON.
Conditions for Clearing the DTC
The condition for setting the DTC is no longer present.
Reference Information
Schematic Reference
Hydraulic Brake Schematics (Encore), Hydraulic Brake Schematics (Encore)
Connector End View Reference
WIRING SYSTEMS AND POWER MANAGEMENT - COMPONENT CONNECTOR END VIEWS - INDEX - ENCORE WIRING SYSTEMS AND POWER MANAGEMENT - COMPONENT CONNECTOR END VIEWS - INDEX - Encore
Description and Operation
Brake Warning System Description and Operation
Electrical Information Reference
- Circuit Testing
- Connector Repairs
- Testing for Intermittent Conditions and Poor Connections
- Wiring Repairs
Scan Tool Reference
Control Module References for scan tool information
Circuit/System Verification
- Verify that the brake is above minimum level.
- If low
Refer to Brake Fluid Loss.
- If above minimum level
- Ignition ON.
- Verify the scan tool Brake Fluid Level Sensor parameter is Ok.
If the parameter is Low
Refer to Circuit/System Testing.
If the parameter is Ok
- All OK.
Circuit/System Testing
- Ignition OFF and all vehicle systems OFF, disconnect the harness connector at the B20 Brake Fluid Level Switch. It may take up to 2 min for all vehicle systems to power down.
- Test for less than 10 ohms between the ground circuit terminal 2 and ground.
If 10 ohms or greater
- Ignition OFF.
- Test for less than 2 ohms in the ground circuit end to end.
- If 2 ohms or greater, repair the open/high resistance in the circuit.
- If less than 2 ohms, repair the open/high resistance in the ground connection.
If less than 10 ohms
- Ignition ON.
- Verify the scan tool Brake Fluid Level Sensor parameter is Low.
- If the parameter is not Low
- Ignition OFF, disconnect the harness connector at the K17 Electronic Brake Control Module.
- Test for infinite resistance between the signal circuit terminal 1 and ground.
- If less than infinite resistance, repair the short to ground on the circuit.
- If infinite resistance, replace the K17 Electronic Brake Control Module.
If the parameter is Low
- Install a 3 A fused jumper wire between the signal circuit terminal 1 and ground.
- Verify the scan tool Brake Fluid Level Sensor parameter is Ok.
If the parameter is not Ok
- Ignition OFF, disconnect the harness connector at the K17 Electronic Brake Control Module, ignition ON.
- Test for less than 1 V between the signal circuit and ground.
- If 1 V or greater, repair the short to voltage on the circuit.
- If less than 1 V.
- Test for less than 2 ohms in the signal circuit end to end.
- If 2 ohms or greater, repair the open/high resistance in the circuit.
- If less than 2 ohms, replace the K17 Electronic Brake Control Module.
If the parameter is Ok
- Test or replace the B20 Brake Fluid Level Switch.
Repair Instructions
Perform the Diagnostic Repair Verification after completing the repair.
- Brake Fluid Level Indicator Switch Replacement
- Control Module References for electronic brake control module replacement, programming and setup.
DTC C027B: Brake booster vacuum sensor/brake booster vacuum pump
Diagnostic Instructions
- Perform the Diagnostic System Check - Vehicle prior to using this diagnostic procedure.
- Review Strategy Based Diagnosis for an overview of the diagnostic approach.
- Diagnostic Procedure Instructions provides an overview of each diagnostic category.
DTC Descriptors
DTC C025E
Brake Booster Vacuum Sensor Circuit
DTC C027B
Brake Booster Electric Vacuum Pump
For symptom byte information refer to Symptom Byte List .
Diagnostic Fault Information
.jpg)
Circuit/System Description
The brake booster vacuum sensor measures the vacuum in the brake booster. The electronic brake control module supplies a 5 v reference and a low reference circuit to the brake booster vacuum sensor. The vacuum sensor supplies a voltage signal in relation to the pressure in the brake booster to the electronic brake control module. When the vacuum within the system becomes low, the electronic brake control module turns on the brake booster pump motor by providing battery voltage to the brake booster pump motor relay. The relay activates and supplies the voltage to the brake booster pump motor.
Conditions for Running the DTC
Engine running
Conditions for Setting the DTC
C025E 01
- A short to voltage is detected on the signal circuit.
- A short to voltage is detected on the 5 V reference circuit.
- A short to voltage is detected on the relay control circuit.
C025E 04
- A open/high resistance is detected on the vacuum sensor signal circuit.
- A open/high resistance is detected on the relay control circuit.
C025E 5A
The Electronic Brake Control Module detected an erratic Vacuum Sensor Signal that is not plausible.
C025E 71
The electronic brake control module receives an invalid serial data message from the engine control module
C027B 01
The electronic brake control module receives an invalid serial data message from the engine control module.
C027B 04
The electronic brake control module receives an invalid serial data message from the engine control module.
Action Taken When the DTC Sets
- The ABS indicator turns ON.
- The red Brake warning indicator turns ON.
- The Electronic Brake Control Module disables the ABS, the traction control, and the electronic stability control for the duration of the ignition cycle.
Conditions for Clearing the DTC
- A current DTC clears when the diagnostic runs and passes.
- The history DTC will clear after 40 consecutive fault-free ignition cycles have occurred.
Reference Information
Schematic Reference
Hydraulic Brake Schematics (Encore), Hydraulic Brake Schematics (Encore)
Connector End View Reference
WIRING SYSTEMS AND POWER MANAGEMENT - COMPONENT CONNECTOR END VIEWS - INDEX - ENCORE WIRING SYSTEMS AND POWER MANAGEMENT - COMPONENT CONNECTOR END VIEWS - INDEX - TRAX
Description and Operation
Brake Assist System Description and Operation
Electrical Information Reference
- Circuit Testing
- Connector Repairs
- Testing for Intermittent Conditions and Poor Connections
- Wiring Repairs
Scan Tool Reference
Control Module References for scan tool information
Circuit/System Testing
C025E 71
- Ignition ON.
- Verify that no other DTCs are set.
- If any other DTCs are set
Refer to Diagnostic Trouble Code (DTC) List - Vehicle .
- If no other DTCs are set
- Replace the K20 Engine Control Module.
- Verify the DTC C025E does not set while operating the vehicle under the conditions for Running the DTC.
- If the DTC sets
Replace the K17 Electronic Brake Control Module.
- If the DTC does not set
- All OK.
C025E 01, C025E 04, C025E 5A, C027B 01, or C027B 04
- Ignition OFF and all vehicle systems OFF, disconnect the KR14 Brake Booster Pump Motor Relay. It may take up to 2 min for all vehicle systems to power down.
- Test for less than 10 ohms between the ground circuit terminal 1 (86) and ground.
If 10 ohms or greater
- Ignition OFF.
- Test for less than 2 ohms in the ground circuit end to end.
- If 2 ohms or greater, repair the open/high resistance in the circuit.
- If less than 2 ohms, repair the open/high resistance in the ground connection.
If less than 10 ohms
- Ignition ON.
- Verify a test lamp illuminates between the B+ circuit terminal 3 (30) and ground.
- If the test lamp does not illuminate and the circuit fuse is good
- Ignition OFF.
- Test for less than 2 ohms in the B+ circuit end to end.
- If 2 ohms or greater, repair the open/high resistance in the circuit.
- If less than 2 ohms, verify the fuse is not open and there is voltage at the fuse.
If the test lamp does not illuminate and the circuit fuse is open
- Ignition OFF.
- Test for infinite resistance between the B+ circuit and ground.
- If less than infinite resistance, repair the short to ground on the circuit.
- If infinite resistance
- Test for infinite resistance between the control circuit terminal 5 (87) and ground.
- If less than infinite resistance, repair the short to ground on the circuit.
- If infinite resistance, replace the KR14 Brake Booster Pump Motor Relay.
If the test lamp illuminates
- Connect a test lamp between the control circuit terminal 2 (85) and the
ground circuit terminal 1 (86).
Clear EBCM DTCs.
- Verify the test lamp turns ON and OFF when commanding the Brake Booster Electric Vacuum Pump ON and OFF with a scan tool.
If the test lamp is always OFF
- Ignition OFF, disconnect the harness connector at the K17 Electronic Brake Control Module.
- Test for infinite resistance between the control circuit and ground.
- If less than infinite resistance, repair the short to ground on the circuit.
- If infinite resistance
- Test for less than 2 ohms in the control circuit end to end.
- If 2 ohms or greater, repair the open/high resistance in the circuit.
- If less than 2 ohms, replace the K17 Electronic Brake Control Module.
If the test lamp is always ON
- Ignition OFF, disconnect the harness connector at the K17 Electronic Brake Control Module, ignition ON.
- Test for less than 1 V between the control circuit and ground.
- If 1 V or greater, repair the short to voltage on the circuit.
- If less than 1 V, replace the K17 Electronic Brake Control Module.
If the test lamp turns ON and OFF
- Verify that a test lamp does not illuminate between the control circuit terminal 5 (87) and ground.
- If the test lamp illuminates
Repair the short to voltage on the control circuit
If the test lamp does not illuminate
- Ignition OFF and all vehicle systems OFF, disconnect the harness connector at the M9 Brake Booster Pump Motor. It may take up to 2 min for all vehicle systems to power down.
- Test for less than 10 ohms between the M9 Brake Booster Pump Motor ground circuit terminal 2 and ground.
If 10 ohms or greater
- Ignition OFF.
- Test for less than 2 ohms in the ground circuit end to end.
- If 2 ohms or greater, repair the open/high resistance in the circuit.
- If less than 2 ohms, repair the open/high resistance in the ground connection.
If less than 10 ohms
- Connect the harness connector at the M9 Brake Booster Pump Motor.
- Ignition ON, connect a 30 A fused jumper wire between the B+ circuit terminal 3 (30) and the control circuit terminal 5 (87) .
- Verify the M9 Brake Booster Pump Motor is activated.
If the M9 Brake Booster Pump Motor does not activate
- Ignition OFF, disconnect the harness connector at the M9 Brake Booster Pump Motor.
- Test for less than 2 ohms in the control circuit end to end.
- If 2 ohms or greater, repair the open/high resistance in the circuit.
- If less than 2 ohms, replace the M9 Brake Booster Pump Motor.
If the M9 Brake Booster Pump Motor activates
- Test for 60-180 ohms between terminals 85 and 86 on the relay.
- If less than 60 or greater than 180 ohms
Replace the relay.
If between 60-180 ohms
- Test for infinite resistance between the terminals listed below
- 30 and 86
- 30 and 85
- 30 and 87
- 85 and 87
- If less than infinite resistance
Replace the relay.
If infinite resistance
- Install a 20 A fused jumper wire between relay terminal 85 and 12 V. Install a jumper wire between relay terminal 86 and ground.
- Test for less than 2 ohms between terminals 30 and 87.
If 2 ohms or greater
Replace the relay.
If less than 2 ohms
- Ignition OFF and all vehicle systems OFF, disconnect the harness connector at the B19B Brake Booster Vacuum Sensor. It may take up to 2 min for all vehicle systems to power down.
- Test for less than 10 ohms between the low reference circuit terminal 2 and ground.
If 10 ohms or greater
- Ignition OFF, disconnect the harness connector at the K17 Electronic Brake Control Module.
- Test for less than 2 ohms in the low reference circuit end to end.
- If 2 ohms or greater, repair the open/high resistance in the circuit.
- If less than 2 ohms, replace the K17 Electronic Brake Control Module.
If less than 10 ohms
- Ignition ON.
- Test for 4.8-5.2 V between the 5 V reference circuit terminal 3 and ground.
If less than 4.8 V
- Ignition OFF, disconnect the harness connector at the K17 Electronic Brake Control Module.
- Test for infinite resistance between the 5 V reference circuit and ground.
- If less than infinite resistance, repair the short to ground on the circuit.
- If infinite resistance
- Test for less than 2 ohms in the 5 V reference circuit end to end.
- If 2 ohms or greater, repair the open/high resistance in the circuit.
- If less than 2 ohms, replace the K17 Electronic Brake Control Module.
If greater than 5.2 V
- Ignition OFF, disconnect the harness connector at the K17 Electronic Brake Control Module, ignition ON.
- Test for less than 1 V between the 5 V reference circuit and ground.
- If 1 V or greater, repair the short to voltage on the circuit.
- If less than 1 V, replace the K17 Electronic Brake Control Module.
If between 4.8-5.2 V
- Ignition OFF, disconnect the harness connector at the K17 Electronic Brake Control Module, Ignition ON.
- Test for less than 1 V between the B19B Brake Booster Vacuum Sensor signal circuit terminal 1 and ground.
If greater than 1 V
Repair the short to voltage on the circuit.
If less than 1 V
- Ignition OFF.
- Test for infinite resistance between the B19B Brake Booster Vacuum Sensor signal circuit terminal 1 and ground.
If less than infinite resistance
Repair the short to ground on the circuit.
If infinite resistance
- Test for less than 2 ohms in the B19B Brake Booster Vacuum Sensor signal circuit end to end.
If 2 ohms or greater
Repair the open/high resistance in the circuit.
If less than 2 ohms
- Replace the B19B Brake Booster Vacuum Sensor.
- Verify the DTC does not set while operating the vehicle under Conditions for Running the DTC.
If the DTC sets
Replace the K17 Electronic Brake Control Module.
If the DTC does not set
- All OK.
Repair Instructions
Perform the Diagnostic Repair Verification after completing the repair.
- Power Brake Booster Vacuum Hose Replacement for brake booster vacuum sensor replacement
- Control Module References for control module replacement, programming and setup.
DTC C025E: Brake booster vacuum sensor/brake booster vacuum pump
Diagnostic Instructions
- Perform the Diagnostic System Check - Vehicle prior to using this diagnostic procedure.
- Review Strategy Based Diagnosis for an overview of the diagnostic approach.
- Diagnostic Procedure Instructions provides an overview of each diagnostic category.
DTC Descriptors
DTC C025E
Brake Booster Vacuum Sensor Circuit
DTC C027B
Brake Booster Electric Vacuum Pump
For symptom byte information refer to Symptom Byte List .
Diagnostic Fault Information
.jpg)
Circuit/System Description
The brake booster vacuum sensor measures the vacuum in the brake booster. The electronic brake control module supplies a 5 v reference and a low reference circuit to the brake booster vacuum sensor. The vacuum sensor supplies a voltage signal in relation to the pressure in the brake booster to the electronic brake control module. When the vacuum within the system becomes low, the electronic brake control module turns on the brake booster pump motor by providing battery voltage to the brake booster pump motor relay. The relay activates and supplies the voltage to the brake booster pump motor.
Conditions for Running the DTC
Engine running
Conditions for Setting the DTC
C025E 01
- A short to voltage is detected on the signal circuit.
- A short to voltage is detected on the 5 V reference circuit.
- A short to voltage is detected on the relay control circuit.
C025E 04
- A open/high resistance is detected on the vacuum sensor signal circuit.
- A open/high resistance is detected on the relay control circuit.
C025E 5A
The Electronic Brake Control Module detected an erratic Vacuum Sensor Signal that is not plausible.
C025E 71
The electronic brake control module receives an invalid serial data message from the engine control module.
C027B 01
The electronic brake control module receives an invalid serial data message from the engine control module.
C027B 04
The electronic brake control module receives an invalid serial data message from the engine control module.
Action Taken When the DTC Sets
- The ABS indicator turns ON.
- The red Brake warning indicator turns ON.
- The Electronic Brake Control Module disables the ABS, the traction control, and the electronic stability control for the duration of the ignition cycle.
Conditions for Clearing the DTC
- A current DTC clears when the diagnostic runs and passes.
- The history DTC will clear after 40 consecutive fault-free ignition cycles have occurred.
Reference Information
Schematic Reference
Hydraulic Brake Schematics (Encore), Hydraulic Brake Schematics (Encore)
Connector End View Reference
WIRING SYSTEMS AND POWER MANAGEMENT - COMPONENT CONNECTOR END VIEWS - INDEX - ENCORE WIRING SYSTEMS AND POWER MANAGEMENT - COMPONENT CONNECTOR END VIEWS - INDEX - Encore
Description and Operation
Brake Assist System Description and Operation
Electrical Information Reference
- Circuit Testing
- Connector Repairs
- Testing for Intermittent Conditions and Poor Connections
- Wiring Repairs
Scan Tool Reference
Control Module References for scan tool information
Circuit/System Testing
C025E 71
- Ignition ON.
- Verify that no other DTCs are set.
If any other DTCs are set
Refer to Diagnostic Trouble Code (DTC) List - Vehicle .
If no other DTCs are set
- Replace the K20 Engine Control Module.
- Verify the DTC C025E does not set while operating the vehicle under the conditions for Running the DTC.
If the DTC sets
Replace the K17 Electronic Brake Control Module.
If the DTC does not set
- All OK.
C025E 01, C025E 04, C025E 5A, C027B 01, or C027B 04
- Ignition OFF and all vehicle systems OFF, disconnect the KR14 Brake Booster Pump Motor Relay. It may take up to 2 min for all vehicle systems to power down.
- Test for less than 10 ohms between the ground circuit terminal 1 (86) and ground.
If 10 ohms or greater
- Ignition OFF.
- Test for less than 2 ohms in the ground circuit end to end.
- If 2 ohms or greater, repair the open/high resistance in the circuit.
- If less than 2 ohms, repair the open/high resistance in the ground connection.
If less than 10 ohms
- Ignition ON.
- Verify a test lamp illuminates between the B+ circuit terminal 3 (30) and ground.
If the test lamp does not illuminate and the circuit fuse is good
- Ignition OFF.
- Test for less than 2 ohms in the B+ circuit end to end.
- If 2 ohms or greater, repair the open/high resistance in the circuit.
- If less than 2 ohms, verify the fuse is not open and there is voltage at the fuse.
If the test lamp does not illuminate and the circuit fuse is open
- Ignition OFF.
- Test for infinite resistance between the B+ circuit and ground.
- If less than infinite resistance, repair the short to ground on the circuit.
- If infinite resistance
- Test for infinite resistance between the control circuit terminal 5 (87) and ground.
- If less than infinite resistance, repair the short to ground on the circuit.
- If infinite resistance, replace the KR14 Brake Booster Pump Motor Relay.
If the test lamp illuminates
- Connect a test lamp between the control circuit terminal 2 (85) and the ground circuit terminal 1 (86). Clear EBCM DTCs.
- Verify the test lamp turns ON and OFF when commanding the Brake Booster Electric Vacuum Pump ON and OFF with a scan tool.
If the test lamp is always OFF
- Ignition OFF, disconnect the harness connector at the K17 Electronic Brake Control Module.
- Test for infinite resistance between the control circuit and ground.
- If less than infinite resistance, repair the short to ground on the circuit.
- If infinite resistance
- Test for less than 2 ohms in the control circuit end to end.
- If 2 ohms or greater, repair the open/high resistance in the circuit.
- If less than 2 ohms, replace the K17 Electronic Brake Control Module.
If the test lamp is always ON
- Ignition OFF, disconnect the harness connector at the K17 Electronic Brake Control Module, ignition ON.
- Test for less than 1 V between the control circuit and ground.
- If 1 V or greater, repair the short to voltage on the circuit.
- If less than 1 V, replace the K17 Electronic Brake Control Module.
If the test lamp turns ON and OFF
- Verify that a test lamp does not illuminate between the control circuit terminal 5 (87) and ground.
If the test lamp illuminates
Repair the short to voltage on the control circuit
If the test lamp does not illuminate
- Ignition OFF and all vehicle systems OFF, disconnect the harness connector at the M9 Brake Booster Pump Motor. It may take up to 2 min for all vehicle systems to power down.
- Test for less than 10 ohms between the M9 Brake Booster Pump Motor ground circuit terminal 2 and ground.
If 10 ohms or greater
- Ignition OFF.
- Test for less than 2 ohms in the ground circuit end to end.
- If 2 ohms or greater, repair the open/high resistance in the circuit.
- If less than 2 ohms, repair the open/high resistance in the ground connection.
If less than 10 ohms
- Connect the harness connector at the M9 Brake Booster Pump Motor.
- Ignition ON, connect a 30 A fused jumper wire between the B+ circuit terminal 3 (30) and the control circuit terminal 5 (87) .
- Verify the M9 Brake Booster Pump Motor is activated.
If the M9 Brake Booster Pump Motor does not activate
- Ignition OFF, disconnect the harness connector at the M9 Brake Booster Pump Motor.
- Test for less than 2 ohms in the control circuit end to end.
- If 2 ohms or greater, repair the open/high resistance in the circuit.
- If less than 2 ohms, replace the M9 Brake Booster Pump Motor.
If the M9 Brake Booster Pump Motor activates
- Test for 60-180 ohms between terminals 85 and 86 on the relay.
If less than 60 or greater than 180 ohms
Replace the relay.
If between 60-180 ohms
- Test for infinite resistance between the terminals listed below:
- 30 and 86
- 30 and 85
- 30 and 87
- 85 and 87
- If less than infinite resistance
Replace the relay.
If infinite resistance
- Install a 20 A fused jumper wire between relay terminal 85 and 12 V. Install a jumper wire between relay terminal 86 and ground.
- Test for less than 2 ohms between terminals 30 and 87.
If 2 ohms or greater
Replace the relay.
If less than 2 ohms
- Ignition OFF and all vehicle systems OFF, disconnect the harness connector at the B19B Brake Booster Vacuum Sensor. It may take up to 2 min for all vehicle systems to power down.
- Test for less than 10 ohms between the low reference circuit terminal 2 and ground.
If 10 ohms or greater
- Ignition OFF, disconnect the harness connector at the K17 Electronic Brake Control Module.
- Test for less than 2 ohms in the low reference circuit end to end.
- If 2 ohms or greater, repair the open/high resistance in the circuit.
- If less than 2 ohms, replace the K17 Electronic Brake Control Module.
If less than 10 ohms
- Ignition ON.
- Test for 4.8-5.2 V between the 5 V reference circuit terminal 3 and ground.
If less than 4.8 V
- Ignition OFF, disconnect the harness connector at the K17 Electronic Brake Control Module.
- Test for infinite resistance between the 5 V reference circuit and ground.
- If less than infinite resistance, repair the short to ground on the circuit.
- If infinite resistance
- Test for less than 2 ohms in the 5 V reference circuit end to end.
- If 2 ohms or greater, repair the open/high resistance in the circuit.
- If less than 2 ohms, replace the K17 Electronic Brake Control Module.
If greater than 5.2 V
- Ignition OFF, disconnect the harness connector at the K17 Electronic Brake Control Module, ignition ON.
- Test for less than 1 V between the 5 V reference circuit and ground.
- If 1 V or greater, repair the short to voltage on the circuit.
- If less than 1 V, replace the K17 Electronic Brake Control Module.
If between 4.8-5.2 V
- Ignition OFF, disconnect the harness connector at the K17 Electronic Brake Control Module, Ignition ON.
- Test for less than 1 V between the B19B Brake Booster Vacuum Sensor signal circuit terminal 1 and ground.
If greater than 1 V
Repair the short to voltage on the circuit.
If less than 1 V
- Ignition OFF.
- Test for infinite resistance between the B19B Brake Booster Vacuum Sensor signal circuit terminal 1 and ground.
If less than infinite resistance
Repair the short to ground on the circuit.
If infinite resistance
- Test for less than 2 ohms in the B19B Brake Booster Vacuum Sensor signal circuit end to end.
If 2 ohms or greater
Repair the open/high resistance in the circuit.
If less than 2 ohms
- Replace the B19B Brake Booster Vacuum Sensor.
- Verify the DTC does not set while operating the vehicle under Conditions for Running the DTC.
If the DTC sets
Replace the K17 Electronic Brake Control Module.
If the DTC does not set
- All OK.
Repair Instructions
Perform the Diagnostic Repair Verification after completing the repair.
- Power Brake Booster Vacuum Hose Replacement for brake booster vacuum sensor replacement
- Control Module References for control module replacement, programming and setup.
Symptoms - hydraulic brakes
NOTE: The following steps must be completed before using the symptom tables.
- Perform the Brake System Vehicle Road Test before using the hydraulic brake symptom tables in order to duplicate the customers concern.
- Review the system operation in order to familiarize yourself with the system functions. Refer to the following:
- Brake Warning System Description and Operation
- Hydraulic Brake System Description and Operation
- Brake Booster Vacuum Assist Description and Operation
- Brake Assist System Description and Operation
- ABS Description and Operation
Visual/Physical Inspection
- Inspect for aftermarket devices which could affect the operation of the hydraulic brake system. Refer to Checking Aftermarket Accessories .
- Inspect the easily accessible or visible system components, for obvious damage or conditions, which could cause the symptom.
Intermittent
Faulty electrical connections or wiring may be the cause of intermittent conditions. Refer to Testing for Intermittent Conditions and Poor Connections .
Symptom List
Refer to a symptom diagnostic procedure from the following list in order to diagnose the symptom:
- Brake Booster Pump Motor Malfunction (Without J41), Brake Booster Pump Motor Malfunction (With J41)
- Brake Warning Indicator Malfunction (Without J41), Brake Warning Indicator Malfunction (With J41)
- Brake Pulsation
- Brake System Noise
- Braking Action Uneven - Pulls to One Side
- Braking Action Uneven - Front to Rear
- Brake Pedal Excessive Travel
- Brake Pedal Excessive Effort
- Brakes Drag
- Brake System Slow Release
- Brake Fluid Loss
BRAKE BOOSTER PUMP MOTOR MALFUNCTION (WITHOUT J41)
Diagnostic Instructions
- Perform the Diagnostic System Check - Vehicle prior to using this diagnostic procedure.
- Review Strategy Based Diagnosis for an overview of the diagnostic approach.
- Diagnostic Procedure Instructions provides an overview of each diagnostic category
Diagnostic Fault Information
.jpg)
Circuit/System Description
The brake booster vacuum sensor measures the vacuum in the brake booster. The electronic brake control module supplies a 5 v reference and a low reference circuit to the brake booster vacuum sensor. The vacuum sensor supplies a voltage signal in relation to the pressure in the brake booster to the electronic brake control module. When the vacuum within the system becomes low, the electronic brake control module turns on the brake booster pump motor by providing battery voltage to the brake booster pump motor relay. The relay activates and supplies the voltage to the brake booster pump motor.
Reference Information
Schematic Reference
Hydraulic Brake Schematics (Encore), Hydraulic Brake Schematics (Encore)
Connector End View Reference
WIRING SYSTEMS AND POWER MANAGEMENT - COMPONENT CONNECTOR END VIEWS - INDEX - ENCORE WIRING SYSTEMS AND POWER MANAGEMENT - COMPONENT CONNECTOR END VIEWS - INDEX - Encore
Description and Operation
Brake Booster Vacuum Assist Description and Operation
Electrical Information Reference
- Circuit Testing
- Connector Repairs
- Testing for Intermittent Conditions and Poor Connections
- Wiring Repairs
Scan Tool Reference
Control Module References
Circuit/System Verification
- Ignition ON.
- Verify the M9 Brake Booster Pump Motor turns ON and OFF when commanding the Brake Booster Electric Vacuum Pump ON and OFF with a scan tool.
If the M9 Brake Booster Pump Motor does not turn ON and OFF
Refer to Circuit/System Testing.
If the M9 Brake Booster Pump Motor turn ON and OFF
- Verify that the brake booster vacuum system has no damage, leakage or incorrect installation.
If damage, leakage or incorrect installation is found
Refer to Brake Assist System Diagnosis.
If the inspection is OK
- All OK.
Circuit/System Testing
- Ignition OFF and all vehicle systems OFF, disconnect the KR14 Brake Booster Pump Motor Relay. It may take up to 2 min for all vehicle systems to power down.
- Test for less than 10 ohms between the ground circuit terminal 1 (86) and ground.
If 10 ohms or greater
- Ignition OFF.
- Test for less than 2 ohms in the ground circuit end to end.
- If 2 ohms or greater, repair the open/high resistance in the circuit.
- If less than 2 ohms, repair the open/high resistance in the ground connection.
If less than 10 ohms
- Ignition ON.
- Verify a test lamp illuminates between the B+ circuit terminal 3 (30) and ground.
If the test lamp does not illuminate and the circuit fuse is good
- Ignition OFF.
- Test for less than 2 ohms in the B+ circuit end to end.
- If 2 ohms or greater, repair the open/high resistance in the circuit.
- If less than 2 ohms, verify the fuse is not open and there is voltage at the fuse.
If the test lamp does not illuminate and the circuit fuse is open
- Ignition OFF.
- Test for infinite resistance between the B+ circuit and ground.
- If less than infinite resistance, repair the short to ground on the circuit.
- If infinite resistance
- Test for infinite resistance between the control circuit terminal 5 (87) and ground.
- If less than infinite resistance, repair the short to ground on the circuit.
- If infinite resistance, replace the KR14 Brake Booster Pump Motor Relay.
If the test lamp illuminates
- Connect a test lamp between the control circuit terminal 2 (85) and the ground circuit terminal 1 (86).
- Verify the test lamp turns ON and OFF when commanding the Brake Booster Electric Vacuum Pump ON and OFF with a scan tool.
If the test lamp is always OFF
- Ignition OFF, disconnect the harness connector at the K17 Electronic Brake Control Module.
- Test for infinite resistance between the control circuit and ground.
- If less than infinite resistance, repair the short to ground on the circuit.
- If infinite resistance
- Test for less than 2 ohms in the control circuit end to end.
- If 2 ohms or greater, repair the open/high resistance in the circuit.
- If less than 2 ohms, replace the K17 Electronic Brake Control Module.
If the test lamp is always ON
- Ignition OFF, disconnect the harness connector at the K17 Electronic Brake Control Module, ignition ON.
- Test for less than 1 V between the control circuit and ground.
- If 1 V or greater, repair the short to voltage on the circuit.
- If less than 1 V, replace the K17 Electronic Brake Control Module.
If the test lamp turns ON and OFF
- Verify that a test lamp does not illuminate between the control circuit terminal 5 (87) and ground.
If the test lamp illuminates
Repair the short to voltage on the control circuit
If the test lamp does not illuminate
- Ignition OFF and all vehicle systems OFF, disconnect the harness connector at the M9 Brake Booster Pump Motor. It may take up to 2 min for all vehicle systems to power down.
- Test for less than 10 ohms between the M9 Brake Booster Pump Motor ground circuit terminal 2 and ground.
If 10 ohms or greater
- Ignition OFF.
- Test for less than 2 ohms in the ground circuit end to end.
- If 2 ohms or greater, repair the open/high resistance in the circuit.
- If less than 2 ohms, repair the open/high resistance in the ground connection.
If less than 10 ohms
- Connect the harness connector at the M9 Brake Booster Pump Motor.
- Ignition ON, connect a 30 A fused jumper wire between the B+ circuit terminal 3 (30) and the control circuit terminal 5 (87).
- Verify the M9 Brake Booster Pump Motor is activated.
If the M9 Brake Booster Pump Motor does not activate
- Ignition OFF, disconnect the harness connector at the M9 Brake Booster Pump Motor.
- Test for less than 2 ohms in the control circuit end to end.
- If 2 ohms or greater, repair the open/high resistance in the circuit.
- If less than 2 ohms, replace the M9 Brake Booster Pump Motor.
If the M9 Brake Booster Pump Motor activates
- Test or replace the KR14 Brake Booster Pump Motor Relay.
Component Testing
Motor Test
- Ignition OFF, disconnect the harness connector at the M9 Brake Booster Pump Motor. Install a 30 A fused jumper wire between the B+ circuit terminal 1 and B+. Install a jumper wire between the ground circuit terminal 2 and ground.
- Verify the M9 Brake Booster Pump Motor activates.
If the brake booster pump motor does not activate
Replace the M9 Brake Booster Pump Motor.
If the brake booster pump motor activates
- All OK.
Relay Test
- Ignition OFF, disconnect the KR14 Brake Booster Pump Motor Relay.
- Test for 60-180 ohms between terminals 1 and 2.
If less than 60 or greater than 180 ohms
Replace the relay.
If between 60-180 ohms
- Test for infinite resistance between the terminals listed below:
- 30 and 86
- 30 and 85
- 30 and 87
- 85 and 87
- If less than infinite resistance
Replace the relay.
If infinite resistance
- Install a 20 A fused jumper wire between relay terminal 85 and 12 V. Install a jumper wire between relay terminal 86 and ground.
- Test for less than 2 ohms between terminals 30 and 87.
If 2 ohms or greater
Replace the relay.
If less than 2 ohms
- All OK.
Repair Instructions
Perform the Diagnostic Repair Verification after completing the repair.
- Relay Replacement (Within an Electrical Center) , Relay Replacement (Attached to Wire Harness) .
- Power Brake Booster Pump Replacement .
- Control Module References for Electronic Brake Control Module replacement, programming and setup.
Brake booster pump motor malfunction (WITH J41)
Diagnostic Instructions
- Perform the Diagnostic System Check - Vehicle prior to using this diagnostic procedure.
- Review Strategy Based Diagnosis for an overview of the diagnostic approach.
- Diagnostic Procedure Instructions provides an overview of each diagnostic category.
Diagnostic Fault Information
.jpg)
Circuit/System Description
When the vacuum within the brake booster system becomes low, the brake booster vacuum switch closes and turns on the brake booster pump motor by providing battery voltage to the brake booster pump motor relay. The relay activates and supplies the voltage to the brake booster pump motor.
Reference Information
Schematic Reference
Hydraulic Brake Schematics (Encore), Hydraulic Brake Schematics (Encore)
Connector End View Reference
WIRING SYSTEMS AND POWER MANAGEMENT - COMPONENT CONNECTOR END VIEWS - INDEX - ENCORE WIRING SYSTEMS AND POWER MANAGEMENT - COMPONENT CONNECTOR END VIEWS - INDEX - Encore
Description and Operation
Brake Booster Vacuum Assist Description and Operation
Electrical Information Reference
- Circuit Testing
- Connector Repairs
- Testing for Intermittent Conditions and Poor Connections
- Wiring Repairs
Scan Tool Reference
Control Module References
Circuit/System Verification
- Ignition ON.
- Deplete the vacuum in the brake booster and verify the M9 Brake Booster Pump Motor turns ON
If the M9 Brake Booster Pump Motor does not turn ON
Refer to Circuit/System Testing.
If the M9 Brake Booster Pump Motor turns ON
- Verify that the brake booster vacuum system has no damage, leakage or incorrect installation.
If damage, leakage or incorrect installation is found
Refer to Brake Assist System Diagnosis.
If the inspection is OK
- All OK.
Circuit/System Testing
- Ignition OFF and all vehicle systems OFF, disconnect the KR14 Brake Booster Pump Motor Relay. It may take up to 2 min for all vehicle systems to power down.
- Test for less than 10 ohms between the ground circuit terminal 1 (86) and ground.
If 10 ohms or greater
- Ignition OFF.
- Test for less than 2 ohms in the ground circuit end to end.
- If 2 ohms or greater, repair the open/high resistance in the circuit.
- If less than 2 ohms, repair the open/high resistance in the ground connection.
If less than 10 ohms
- Ignition ON.
- Verify a test lamp illuminates between the B+ circuit terminal 3 (30) and ground.
- If the test lamp does not illuminate and the circuit fuse is good
- Ignition OFF.
- Test for less than 2 ohms in the B+ circuit end to end.
- If 2 ohms or greater, repair the open/high resistance in the circuit.
- If less than 2 ohms, verify the fuse is not open and there is voltage at the fuse.
If the test lamp does not illuminate and the circuit fuse is open
- Ignition OFF.
- Test for infinite resistance between the B+ circuit and ground.
- If less than infinite resistance, repair the short to ground on the circuit.
- If infinite resistance
- Disconnect the M9 Brake Booster Pump Motor.
- Test for infinite resistance between the control circuit terminal 5 (87) and ground.
- If less than infinite resistance, repair the short to ground on the circuit.
- If infinite resistance, replace the KR14 Brake Booster Pump Motor Relay.
If the test lamp illuminates
- Ignition OFF, disconnect the B19C Brake Booster Vacuum Switch, ignition ON.
- Verify a test lamp illuminates between ignition circuit terminal 1 and ground.
If the test lamp does not illuminate and the circuit fuse is good
- Ignition OFF.
- Test for less than 2 ohms in the ignition circuit end to end.
- If 2 ohms or greater, repair the open/high resistance in the circuit.
- If less than 2 ohms, verify the fuse is not open and there is voltage at the fuse.
- If the test lamp does not illuminate and the circuit fuse is open
- Ignition OFF.
- Test for infinite resistance between the ignition circuit and ground.
- If less than infinite resistance, repair the short to ground on the circuit.
- If infinite resistance
- Test for infinite resistance between the B19C Brake Booster Vacuum Switch terminal 2 and ground.
- If less than infinite resistance, repair the short to ground on the circuit.
- If infinite resistance, replace the KR14 Brake Booster Pump Motor Relay.
If the test lamp illuminates
- Connect a test lamp between the KR14 Brake Booster Pump Motor Relay control circuit terminal 2 (85) and the ground circuit terminal 1 (86).
If the test lamp illuminates
Repair the short to voltage on the control circuit
If the test lamp does not illuminate
- Ignition OFF, connect the B19C Brake Booster Vacuum Switch. Remove the vacuum hose from the brake booster to deplete the vacuum in the system, ignition ON. Verify the test lamp illuminates
If the test lamp does not illuminate
- Ignition OFF, disconnect the harness connector at the B19C Brake Booster Vacuum Switch.
- Test for less than 2 ohms in the control circuit end to end.
- If 2 ohms or greater, repair the open/high resistance in the circuit.
- If less than 2 ohms, replace the B19C Brake Booster Vacuum Switch.
If the test lamp illuminates
- Verify that a test lamp does not illuminate between the relay control circuit terminal 5 (87) and ground.
If the test lamp illuminates
Repair the short to voltage on the control circuit
If the test lamp does not illuminate
- Ignition OFF and all vehicle systems OFF, disconnect the harness connector at the M9 Brake Booster Pump Motor. It may take up to 2 min for all vehicle systems to power down.
- Test for less than 10 ohms between the M9 Brake Booster Pump Motor ground circuit terminal 2 and ground
If 10 ohms or greater
- Test for less than 2 ohms in the ground circuit end to end.
- If 2 ohms or greater, repair the open/high resistance in the circuit.
- If less than 2 ohms, repair the open/high resistance in the ground connection.
If less than 10 ohms
- Connect the harness connector at the M9 Brake Booster Pump Motor.
- Ignition ON, connect a 30 A fused jumper wire between the B+ circuit terminal 3 (30) and the control circuit terminal 5 (87).
- Verify the M9 Brake Booster Pump Motor is activated.
If the M9 Brake Booster Pump Motor does not activate
- Ignition OFF, disconnect the harness connector at the M9 Brake Booster Pump Motor.
- Test for less than 2 ohms in the control circuit end to end.
- If 2 ohms or greater, repair the open/high resistance in the circuit.
- If less than 2 ohms, replace the M9 Brake Booster Pump Motor.
If the M9 Brake Booster Pump Motor activates
- Test or replace the KR14 Brake Booster Pump Motor Relay.
Component Testing
Motor Test
- Ignition OFF, disconnect the harness connector at the M9 Brake Booster Pump Motor. Install a 30 A fused jumper wire between the B+ circuit terminal 1 and B+. Install a jumper wire between the ground circuit terminal 2 and ground.
- Verify the M9 Brake Booster Pump Motor activates.
If the brake booster pump motor does not activate
Replace the M9 Brake Booster Pump Motor.
If the brake booster pump motor activates
- All OK.
Relay Test
- Ignition OFF, disconnect the KR14 Brake Booster Pump Motor Relay.
- Test for 60-180 ohms between terminals 1 and 2.
If less than 60 or greater than 180 ohms
Replace the relay.
If between 60-180 ohms
- Test for infinite resistance between the terminals listed below:
- 30 and 86
- 30 and 85
- 30 and 87
- 85 and 87
If less than infinite resistance
Replace the relay.
If infinite resistance
- Install a 20 A fused jumper wire between relay terminal 85 and 12 V. Install a jumper wire between relay terminal 86 and ground.
- Test for less than 2 ohms between terminals 30 and 87.
If 2 ohms or greater
Replace the relay.
If less than 2 ohms
- All OK.
Repair Instructions
Perform the Diagnostic Repair Verification after completing the repair.
- Relay Replacement (Within an Electrical Center) , Relay Replacement (Attached to Wire Harness) .
- Power Brake Booster Pump Replacement .
Brake warning indicator malfunction (WITHOUT J41)
Diagnostic Instructions
- Perform the Diagnostic System Check - Vehicle prior to using this diagnostic procedure.
- Review Strategy Based Diagnosis for an overview of the diagnostic approach.
- Diagnostic Procedure Instructions provides an overview of each diagnostic category.
Diagnostic Fault Information
.jpg)
Circuit/System Description
The instrument cluster turns ON the brake warning indicator for 5 s after ignition ON. The body control module monitors the parking brake switch and will request the instrument cluster via serial data to turn the brake warning indicator ON when the parking brake is applied. The electronic brake control module monitors the brake fluid level switch and will request the instrument cluster via serial data to turn the brake warning indicator ON when low brake fluid is detected.
Reference Information
Schematic Reference
Hydraulic Brake Schematics (Encore), Hydraulic Brake Schematics (Encore)
Connector End View Reference
WIRING SYSTEMS AND POWER MANAGEMENT - COMPONENT CONNECTOR END VIEWS - INDEX - ENCORE WIRING SYSTEMS AND POWER MANAGEMENT - COMPONENT CONNECTOR END VIEWS - INDEX - Encore
Description and Operation
Hydraulic Brake System Description and Operation
Electrical Information Reference
- Circuit Testing
- Connector Repairs
- Testing for Intermittent Conditions and Poor Connections
- Wiring Repairs
Scan Tool Reference
Control Module References for scan tool information
Circuit/System Verification
- Verify that the brake fluid is above minimum level.
If low
Refer to Brake Fluid Loss.
If above minimum level
- Ignition ON.
- Verify the scan tool Brake Fluid Level Sensor is OK.
If the parameter is Low
Refer to Circuit/System Testing - Brake Fluid Level Switch Malfunction.
If the parameter is OK
- Verify the scan tool Park Brake Switch parameter changes between Applied and Released while applying and releasing the parking brake.
If the parameter does not change
Refer to Circuit/System Testing - Park Brake Switch Malfunction.
If the parameter changes
- Verify the brake warning indicator turns ON and OFF, when commanding the instrument cluster All Indicators On and Off with a scan tool.
If the brake warning indicator does not turn ON and OFF
Replace the P16 Instrument Cluster.
If the brake warning indicator turns ON and OFF
- All OK.
Circuit/System Testing
NOTE: Circuit/System Verification must be performed before Circuit/System Testing
Brake Fluid Level Switch Malfunction
- Ignition OFF and all vehicle systems OFF, disconnect the harness connector at the B20 Brake Fluid Level Switch. It may take up to 2 min for all vehicle systems to power down.
- Test for less than 10 ohms between the ground circuit terminal 2 and ground.
If 10 ohms or greater
- Ignition OFF.
- Test for less than 2 ohms in the ground circuit end to end.
- If 2 ohms or greater, repair the open/high resistance in the circuit.
- If less than 2 ohms, repair the open/high resistance in the ground connection.
If less than 10 ohms
- Ignition ON.
- Verify the scan tool Brake Fluid Level Sensor parameter is Low.
If the parameter is not Low
- Ignition OFF, disconnect the harness connector at the K17 Electronic Brake Control Module.
- Test for infinite resistance between the signal circuit terminal 1 and ground.
- If less than infinite resistance, repair the short to ground on the circuit.
- If infinite resistance, replace the K17 Electronic Brake Control Module.
If the parameter is Low
- Install a 3 A fused jumper wire between the signal circuit terminal 1 and ground.
- Verify the scan tool Brake Fluid Level Sensor parameter is OK.
If the parameter is Low
- Ignition OFF, disconnect the harness connector at the K17 Electronic Brake Control Module, ignition ON.
- Test for less than 1 V between the signal circuit and ground.
- If 1 V or greater, repair the short to voltage on the circuit.
- If less than 1 V.
- Test for less than 2 ohms in the signal circuit end to end.
- If 2 ohms or greater, repair the open/high resistance in the circuit.
- If less than 2 ohms, replace the K17 Electronic Brake Control Module.
If the parameter is OK
- Test or replace the B20 Brake Fluid Level Switch.
Park Brake Switch Malfunction
- Ignition OFF, disconnect the harness connector at the B80 Park Brake Switch.
- Verify that the B80 Park Brake Switch has no physical damage or incorrect installation.
If physical damage or incorrect installation is found
Test or replace the B80 Park Brake Switch.
If the inspection is OK
- Ignition ON.
- Verify the scan tool Park Brake Switch parameter is Released.
If the parameter is Applied
- Ignition OFF, disconnect the harness connector at the K9 Body Control Module.
- Test for infinite resistance between the signal circuit terminal A and ground.
- If less than infinite resistance, repair the short to ground on the circuit.
- If infinite resistance, replace the K9 Body Control Module.
If the parameter is Released
- Install a 3 A fused jumper wire between the signal circuit terminal A and ground.
- Verify the scan tool Park Brake Switch parameter is Applied.
If the parameter is Released
- Ignition OFF, disconnect the harness connector at the K9 Body Control Module, ignition ON.
- Test for less than 1 V between the signal circuit and ground.
- If 1 V or greater, repair the short to voltage on the circuit.
- If less than 1 V.
- Test for less than 2 ohms in the signal circuit end to end.
- If 2 ohms or greater, repair the open/high resistance in the circuit.
- If less than 2 ohms, replace the K9 Body Control Module.
If the parameter is Applied
- Test or replace the B80 Park Brake Switch.
Repair Instructions
Perform the Diagnostic Repair Verification after completing the repair.
- Brake Fluid Level Indicator Switch Replacement
- Parking Brake Indicator Switch Replacement
- Control Module References for control module replacement, programming and setup.
Brake warning indicator malfunction (WITH J41)
Diagnostic Instructions
- Perform the Diagnostic System Check - Vehicle prior to using this diagnostic procedure.
- Review Strategy Based Diagnosis for an overview of the diagnostic approach.
- Diagnostic Procedure Instructions provides an overview of each diagnostic category
Diagnostic Fault Information
.jpg)
Circuit/System Description
The instrument cluster turns ON the brake warning indicator for 5 s after ignition ON. The body control module monitors the parking brake switch and the brake fluid level switch and will request the instrument cluster via serial data to turn the brake warning indicator ON when the parking brake is applied or low brake fluid is detected.
Reference Information
Schematic Reference
Hydraulic Brake Schematics (Encore), Hydraulic Brake Schematics (Encore)
Connector End View Reference
WIRING SYSTEMS AND POWER MANAGEMENT - COMPONENT CONNECTOR END VIEWS - INDEX - ENCORE WIRING SYSTEMS AND POWER MANAGEMENT - COMPONENT CONNECTOR END VIEWS - INDEX - Encore
Description and Operation
Hydraulic Brake System Description and Operation
Electrical Information Reference
- Circuit Testing
- Connector Repairs
- Testing for Intermittent Conditions and Poor Connections
- Wiring Repairs
Scan Tool Reference
Control Module References for scan tool information
Circuit/System Verification
- Verify that the brake fluid is above minimum level.
If low
Refer to Brake Fluid Loss.
If above minimum level
- Ignition ON.
- Verify the scan tool Brake Fluid Level Sensor is OK.
- If the parameter is Low
Refer to Circuit/System Testing - Brake Fluid Level Switch Malfunction.
- If the parameter is OK
- Verify the scan tool Park Brake Switch parameter changes between Applied and Released while applying and releasing the parking brake.
- If the parameter does not change
Refer to Circuit/System Testing - Park Brake Switch Malfunction.
- If the parameter changes
- Verify the brake warning indicator turns ON and OFF, when commanding the instrument cluster All Indicators On and Off with a scan tool.
- If the brake warning indicator does not turn ON and OFF
Replace the P16 Instrument Cluster.
- If the brake warning indicator turns ON and OFF
- All OK.
Circuit/System Testing
NOTE: Circuit/System Verification must be performed before Circuit/System Testing.
Brake Fluid Level Sensor Malfunction
- Ignition OFF and all vehicle systems OFF, disconnect the harness connector at the B20 Brake Fluid Level Switch. It may take up to 2 min for all vehicle systems to power down.
- Test for less than 10 ohms between the ground circuit terminal 2 and ground.
If 10 ohms or greater
- Ignition OFF.
- Test for less than 2 ohms in the ground circuit end to end.
- If 2 ohms or greater, repair the open/high resistance in the circuit.
- If less than 2 ohms, repair the open/high resistance in the ground connection.
If less than 10 ohms
- Ignition ON.
- Verify the scan tool Brake Fluid Level Sensor parameter is Low.
If the parameter is not Low
- Ignition OFF, disconnect the harness connector at the K9 Body Control Module.
- Test for infinite resistance between the signal circuit terminal 1 and ground.
- If less than infinite resistance, repair the short to ground on the circuit.
- If infinite resistance, replace the K9 Body Control Module.
If the parameter is Low
- Install a 3 A fused jumper wire between the signal circuit terminal 1 and ground.
- Verify the scan tool Brake Fluid Level Sensor parameter is OK.
If the parameter is Low
- Ignition OFF, disconnect the harness connector at the K9 Body Control Module, ignition ON.
- Test for less than 1 V between the signal circuit and ground.
- If 1 V or greater, repair the short to voltage on the circuit.
- If less than 1 V.
- Test for less than 2 ohms in the signal circuit end to end.
- If 2 ohms or greater, repair the open/high resistance in the circuit.
- If less than 2 ohms, replace the K9 Body Control Module
If the parameter is OK
- Test or replace the B20 Brake Fluid Level Switch.
Park Brake Switch Malfunction
- Ignition OFF, disconnect the harness connector at the B80 Park Brake Switch.
- Verify that the B80 Park Brake Switch has no physical damage or incorrect installation.
If physical damage or incorrect installation is found
Test or replace the B80 Park Brake Switch.
If the inspection is OK
- Ignition ON.
- Verify the scan tool Park Brake Switch parameter is Released.
If the parameter is Applied
- Ignition OFF, disconnect the harness connector at the K9 Body Control Module.
- Test for infinite resistance between the signal circuit terminal A and ground.
- If less than infinite resistance, repair the short to ground on the circuit.
- If infinite resistance, replace the K9 Body Control Module.
If the parameter is Released
- Install a 3 A fused jumper wire between the signal circuit terminal A and ground.
- Verify the scan tool Park Brake Switch parameter is Applied.
If the parameter is Released
- Ignition OFF, disconnect the harness connector at the K9 Body Control Module, ignition ON.
- Test for less than 1 V between the signal circuit and ground
- If 1 V or greater, repair the short to voltage on the circuit.
- If less than 1 V.
- Test for less than 2 ohms in the signal circuit end to end.
- If 2 ohms or greater, repair the open/high resistance in the circuit.
- If less than 2 ohms, replace theK9 Body Control Module.
If the parameter is Applied
- Test or replace the B80 Park Brake Switch.
Repair Instructions
Perform the Diagnostic Repair Verification after completing the repair.
- Brake Fluid Level Indicator Switch Replacement
- Parking Brake Indicator Switch Replacement
- Control Module References for body control module replacement, programming and setup.
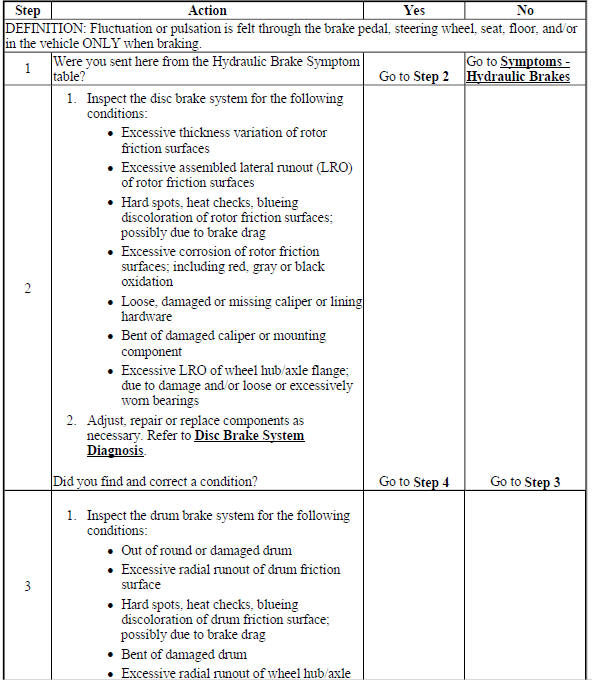
Brake pulsation
Brake Pulsation
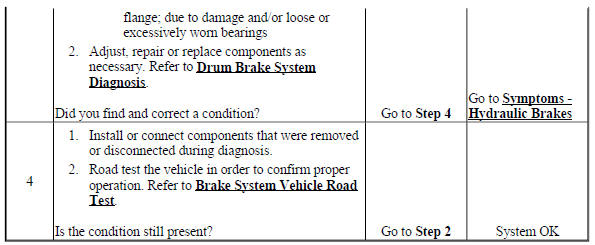
BRAKE SYSTEM NOISE
Brake System Noise
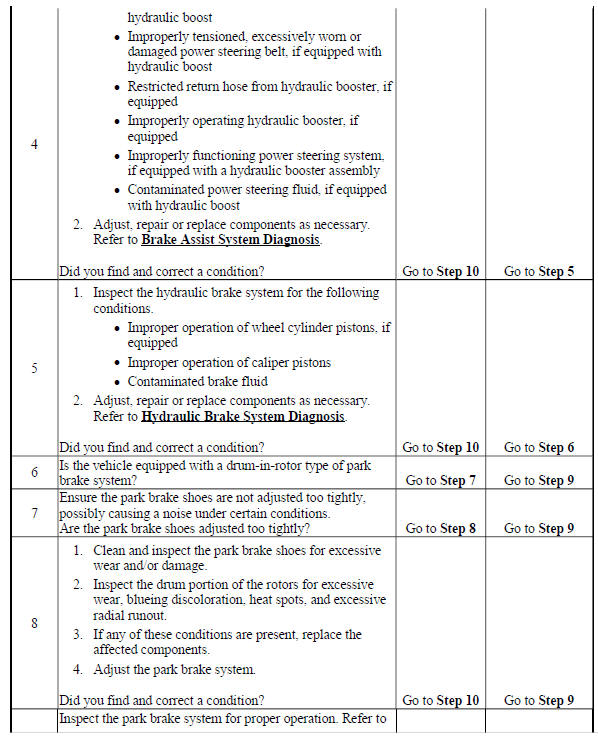
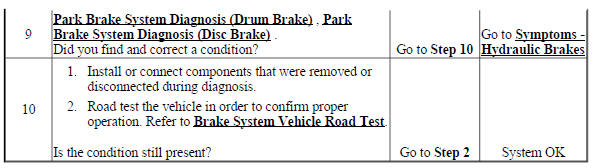
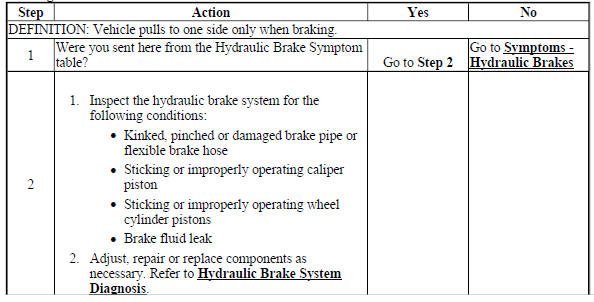
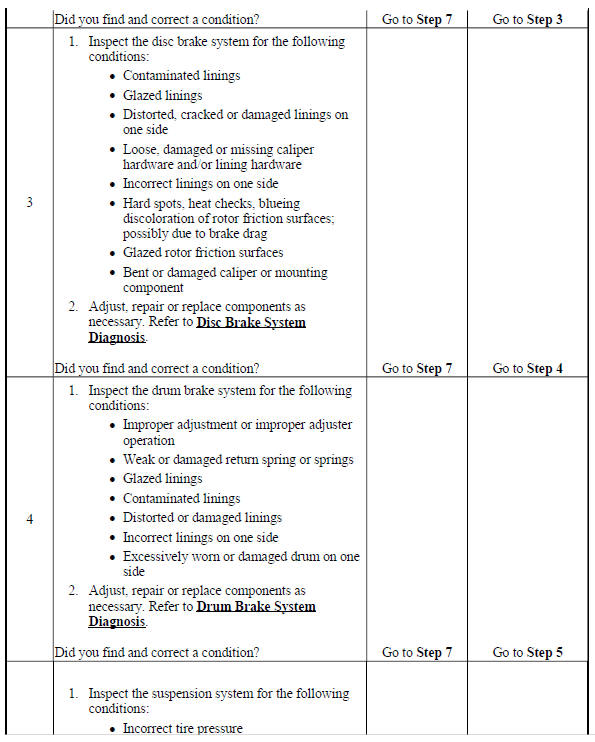
Braking action uneven - pulls to one side
Test Description
The number below refer to the step number on the diagnostic table:
5
Suspension components that are not operating properly may cause a disturbance to the vehicle during application of the brake system.
6
Steering components that are not operating correctly may cause a disturbance to the vehicle during application of the brake system.
Braking Action Uneven - Pulls to One Side
BRAKING ACTION UNEVEN - FRONT TO REAR
Test Description
The number below refers to the step number on the diagnostic table:
5
Suspension components that are not operating properly may cause a disturbance to the vehicle during application of the brake system.
Braking Action Uneven - Front to Rear

.jpg)
BRAKE PEDAL EXCESSIVE TRAVEL
Brake Pedal Excessive Travel
.jpg)
.jpg)
.jpg)
.jpg)
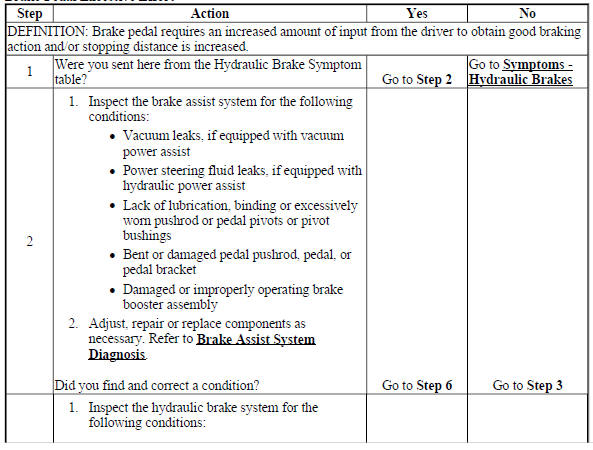
BRAKE PEDAL EXCESSIVE EFFORT
Brake Pedal Excessive Effort
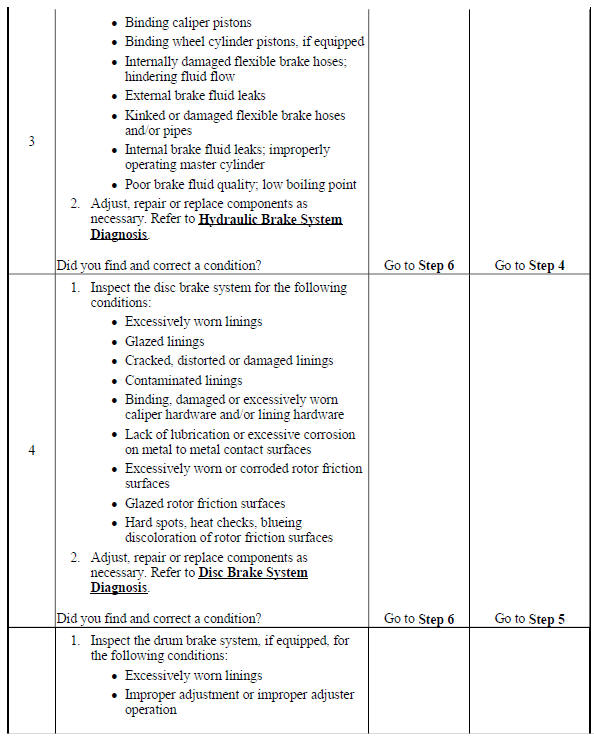
BRAKES DRAG
Brakes Drag
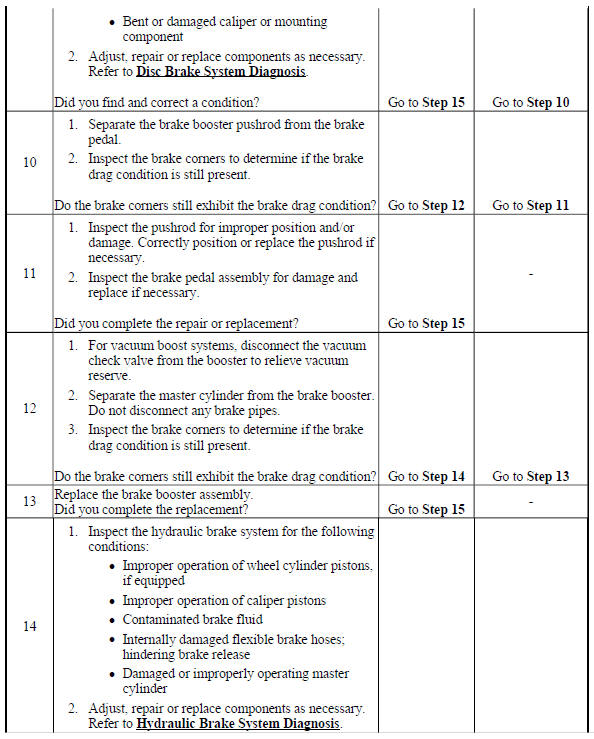
BRAKE SYSTEM SLOW RELEASE
Brake System Slow Release
.jpg)
BRAKE FLUID LOSS
Brake Fluid Loss

.jpg)
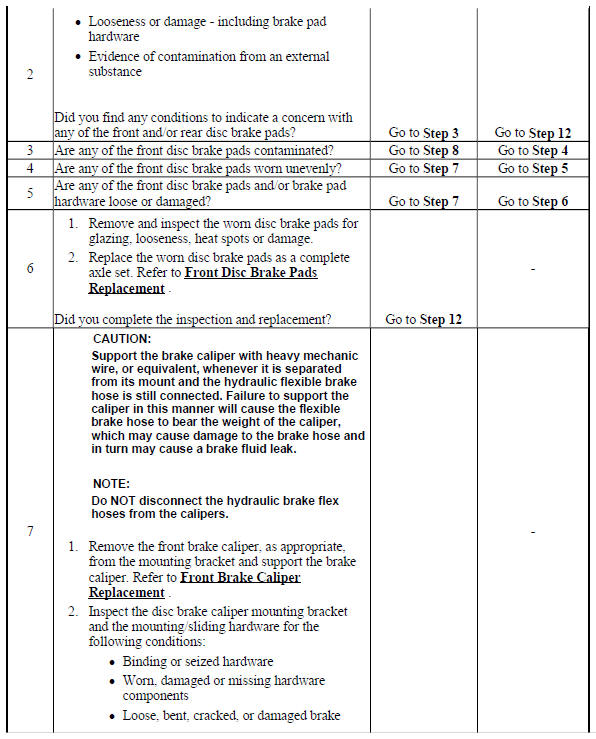
DISC BRAKE SYSTEM DIAGNOSIS
Test Description
The numbers below refer to the step numbers on the diagnostic table:
9
Lubricant leaks from non-brake system components may come in contact with and contaminate brake system components.
10
Lubricant leaks from non-brake system components may come in contact with and contaminate brake system components.
12
Disc brake rotor shields/backing plates that come in contact with disc brake rotors may cause brake system noise.
15
Disc brake rotor thickness variation that exceeds the maximum acceptable level can cause brake pulsation.
19
Disc brake rotor thickness variation that exceeds the maximum acceptable level can cause brake pulsation.
22
Disc brake rotor assembled lateral runout (LRO) that exceeds the maximum acceptable level can lead to thickness variation.
Disc Brake System Diagnosis
.jpg)
.jpg)
.jpg)
.jpg)
.jpg)
.jpg)
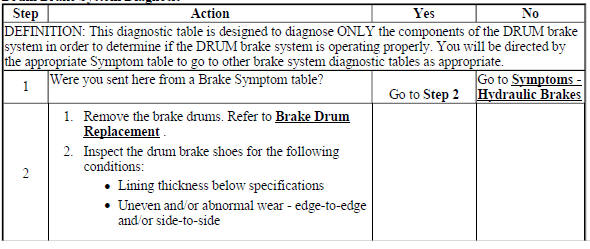
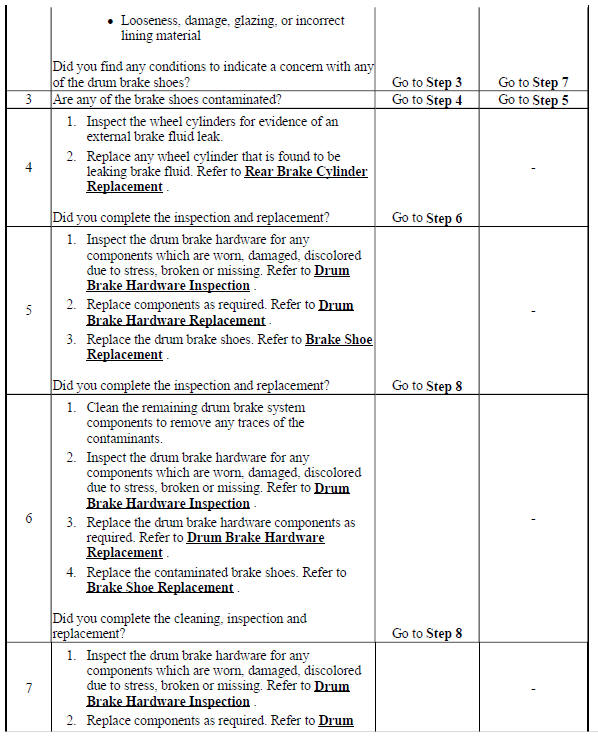
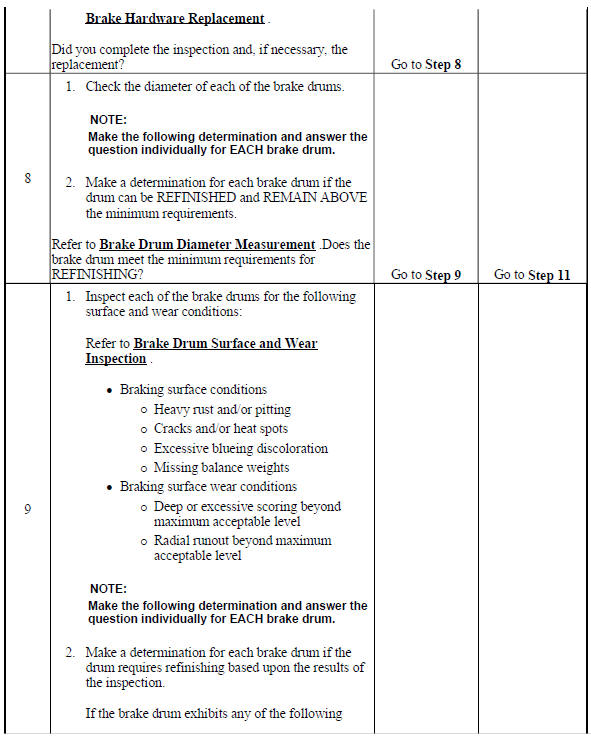
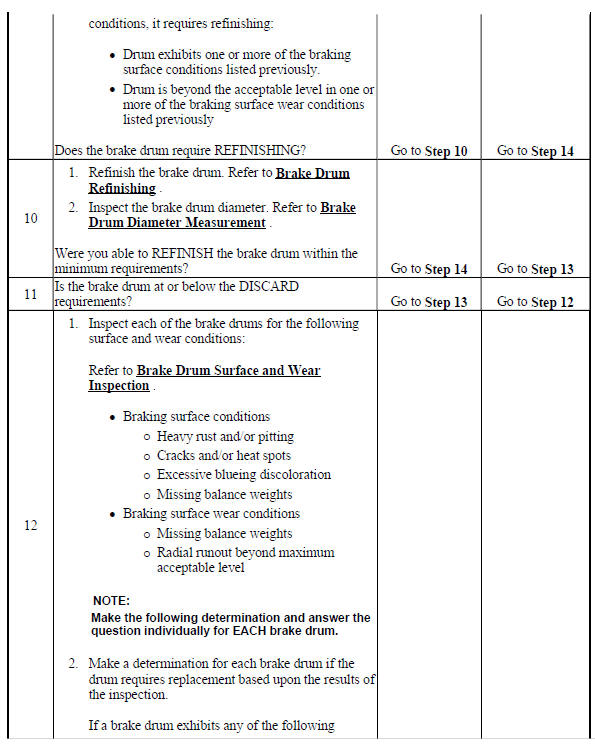
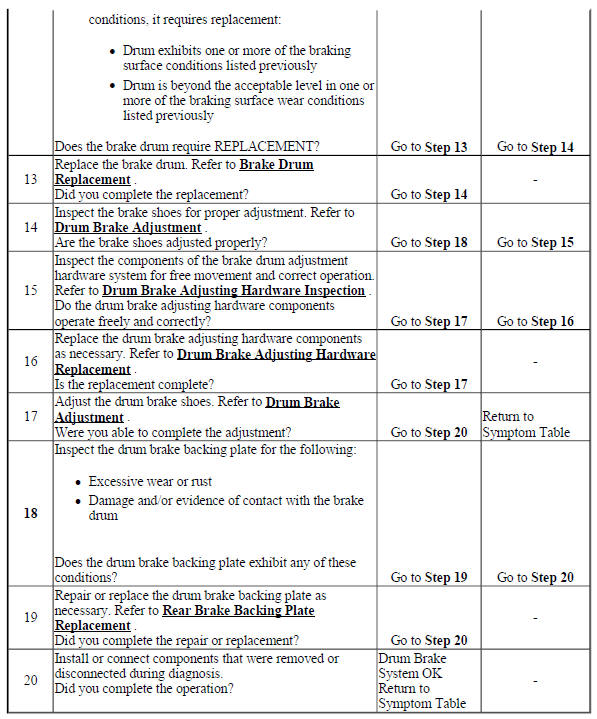
DRUM BRAKE SYSTEM DIAGNOSIS
Test Description
The number below refers to the step number on the diagnostic table:
18
Drum brake backing plates that come in contact with brake drums may cause brake system noise.
Drum Brake System Diagnosis
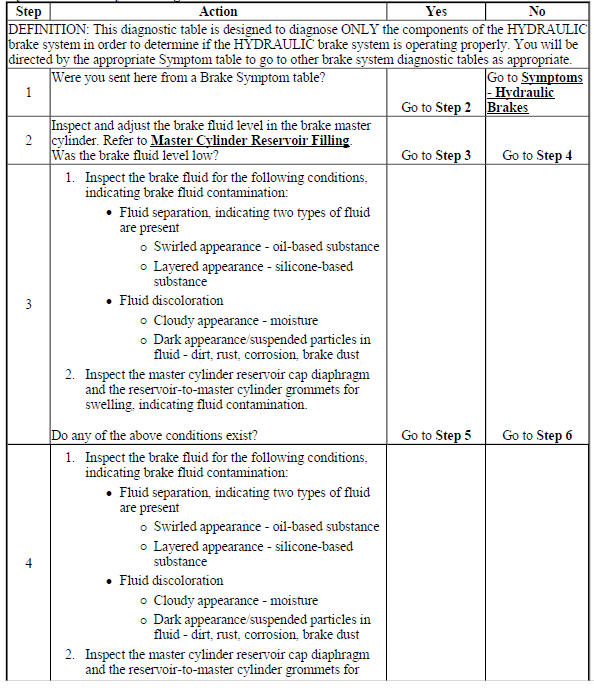
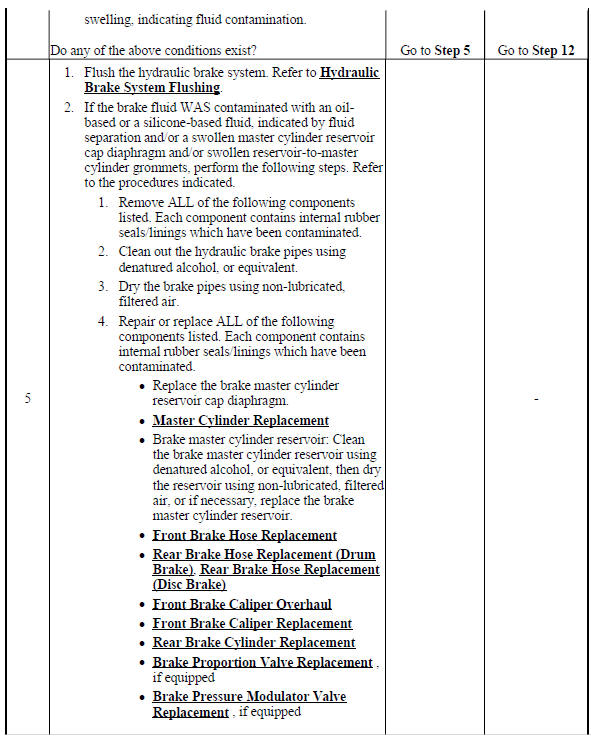
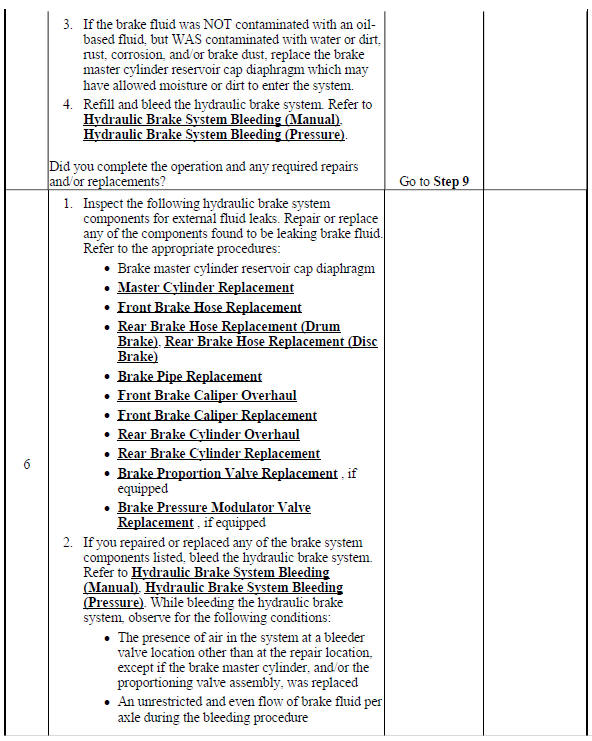
HYDRAULIC BRAKE SYSTEM DIAGNOSIS
Hydraulic Brake System Diagnosis
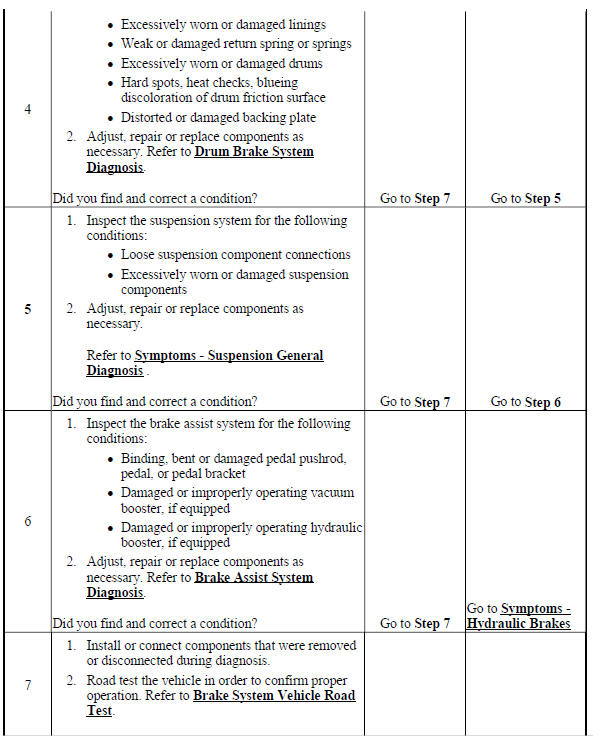
BRAKE ASSIST SYSTEM DIAGNOSIS
Brake Assist System Diagnosis

Brake system vehicle road test
Preliminary Inspections
- Visually inspect easily accessible brake system components for obvious damage and/or leaks which may indicate that the vehicle should not be driven until further inspections have been completed.
- Inspect the brake master cylinder reservoir fluid level and adjust only if necessary for brake system road testing. Refer to Master Cylinder Reservoir Filling.
- Inspect the tire inflation pressures and adjust as necessary.
- Inspect the tire tread patterns to ensure that they are the same or very similar, especially per axle.
- Ensure that the vehicle is not loaded unevenly prior to brake system road testing.
Road Testing Procedure
WARNING: Road test a vehicle under safe conditions and while obeying all traffic laws. Do not attempt any maneuvers that could jeopardize vehicle control. Failure to adhere to these precautions could lead to serious personal injury and vehicle damage.
- Start the engine and allow it to idle.
- Visually inspect if the brake warning indicator lamp remains illuminated.
- If the brake system warning lamp remains illuminated, DO NOT proceed to test drive the vehicle until it is diagnosed and repaired. Refer to Symptoms - Hydraulic Brakes.
- Select a smooth, dry, clean and level road or large lot that is as free of traffic and obstacles as possible for brake system low speed road testing.
- With the transmission in PARK or Neutral, lightly apply the brake pedal. Observe both the pedal feel and the pedal travel.
- If the brake pedal apply felt spongy, or the pedal travel was excessive, DO NOT drive the vehicle until it is repaired.
- If the brake pedal apply did not feel spongy and the pedal travel was excessive, proceed to step 6.
- Release and apply the brakes.
- While continuing to apply the brakes, shift the transmission into DRIVE or 1st, release the brakes and allow the engine to idle the vehicle away from the stopped position. Observe for a slow release of the brake system.
- With the aid of an assistant to observe the vehicle's performance from outside of the vehicle, drive the vehicle at a low speed and lightly apply the brakes while driving past the assistant. Have the assistant observe for brake system noise from the side of the vehicle closest to them, while you observe both the pedal effort and the pedal travel.
- If the brake pedal apply effort was excessive, or the pedal travel was excessive, DO NOT continue to test drive the vehicle until it is repaired.
- If the brake pedal apply effort was not excessive and the pedal travel was not excessive, proceed to step 9.
- Drive the vehicle in the opposite direction, at the same low speed and lightly apply the brakes while driving past the assistant. Have the assistant observe for brake system noise from the side of the vehicle closest to the assistant.
- Drive the vehicle at a low speed and shift the transmission into NEUTRAL
without applying the brakes.
Observe for a rapid deceleration in vehicle speed, indicating possible brake drag.
- Select a smooth, dry, clean and level road that is as free of heavy traffic as possible for brake system moderate speed road testing.
- Drive the vehicle at a moderate speed. Observe for a pull and/or incorrect tracking of the vehicle without the brakes applied.
- While continuing to drive the vehicle at a moderate speed, perform
several light applies of the brakes.
Observe the pedal effort and the pedal travel, observe for brake system noise, pulsation and/or brake drag
- If the brake pedal apply effort was excessive, or the pedal travel was excessive, DO NOT continue to test drive the vehicle until it is repaired.
- If the brake pedal apply effort was not excessive and the pedal travel was not excessive, proceed to step 14.
- While continuing to drive the vehicle at a moderate speed, perform several moderate applies of the brakes. Observe the pedal effort and the pedal travel, observe for brake system pulsation and/or uneven braking action - either side to side, or front to rear.
A small amount of vehicle front end dip is expected during a moderate apply of the brakes.
- If the brake pedal apply effort was excessive, or the pedal travel was excessive, DO NOT continue to test drive the vehicle until it is repaired.
Brake pedal travel measurement and inspection
Special Tools
CH-28662 Brake Pedal Effort Gauge
For equivalent regional tools, refer to Special Tools.
- With the ignition OFF and the brakes cool, apply the brakes 3-5 times, or until the brake pedal becomes firm, in order to deplete the brake booster power reserve.
.gif)
Fig. 3: Steering Wheel, Brake Pedal And Gauge
- Install the CH-28662 gauge (1), or equivalent, to the brake pedal (3).
- Measure and record the distance (a) from the brake pedal (3) to the rim of the steering wheel (2). Note the points of measurement.
.gif)
Fig. 4: Brake Pedal Components And Travel Measurement
- Apply and maintain a force of 445 N (100 lb) to the brake pedal, as indicated on the CH-28662 gauge (1), or equivalent.
- While maintaining 445 N (100 lb) of force to the brake pedal (3), measure and record the distance (b) from the same point on the brake pedal (3) to the same point on the rim of the steering wheel (2).
- Release the brake pedal (3) and repeat steps 4 and 5 to obtain a second measurement. After obtaining a second measurement, proceed to step 7.
- Average the first and second measurements recorded for the 2 applies of the brakes.
- Subtract the initial unapplied distance (a), from the average applied distance (b) to obtain the brake pedal travel measurement (c).
Specification
Maximum brake pedal travel - measured with the ignition OFF, brake booster power assist depleted, and the brakes cool.
BRAKE SYSTEM VACUUM SOURCE TEST
NOTE:
- Engine temperature, accessory load, and elevation level will affect engine vacuum.
- Vacuum readings will decrease by approximately 2.7 kPa (0.8 in Hg) for every 305 m (1000 ft) of elevation above sea level.
- Disconnect the engine vacuum hose from the vacuum brake booster check valve.
- Install a vacuum gauge to the engine vacuum hose.
- Install a scan tool to the vehicle.
- Start the engine and allow the engine to idle until normal operating temperatures are reached.
NOTE: To obtain the gauge pressure from the manifold absolute pressure (MAP) sensor, subtract the absolute pressure of the MAP sensor from atmospheric pressure.
- With the vehicle in PARK or NEUTRAL with the park brake on, the engine idling, and the air conditioning (A/C) system OFF, check to see if the engine vacuum reading is the gauge pressure calculated from the pressure of the MAP sensor indicated on the scan tool.
- Turn the ignition OFF.
- If the engine vacuum reading is within the specified normal range, proceed to step 11.
- If the engine vacuum reading is NOT within the specified normal range, inspect the engine vacuum hose for the following conditions.
- Loose connection to the engine
- Collapse, deformation or contamination
- Cracks, cuts, or brittleness
- If any of these conditions were found with the engine vacuum hose, replace the hose, then repeat steps 2- 5.
- If none of these conditions were found with the engine vacuum hose, then there is an engine vacuum source problem, check the engine vacuum system.
- Remove the vacuum brake booster check valve from the booster.
- Install the check valve to the engine vacuum hose.
- Install the vacuum gauge to the check valve.
- Start the engine and allow the engine to idle in park or neutral with the park brake on and with the A/C system OFF, until normal operating temperatures are reached.
- Turn the ignition OFF.
NOTE: To obtain the gauge pressure from the manifold absolute pressure (MAP) sensor, subtract the absolute pressure of the MAP sensor from atmospheric pressure.
- Visually inspect the engine vacuum reading is maintained at the same gauge pressure as the pressure obtained form the MAP sensor as indicated on the scan tool.
- If the engine vacuum reading is maintained within the specified normal range, proceed to step 19.
- If the engine vacuum reading is NOT maintained within the specified normal range, replace the vacuum brake booster check valve, then repeat steps 12-16.
- Inspect the vacuum brake booster check valve grommet for the following conditions:
- Loose connection to the vacuum brake booster
- Deformation or contamination
- Cracks, cuts or brittlene
- If any of these conditions were found with the check valve grommet, replace the grommet.
Brake system external leak inspection
WARNING: Refer to Brake Fluid Irritant Warning .
CAUTION: Refer to Brake Fluid Effects on Paint and Electrical Components Caution
- In order to inspect for external brake fluid leaks, first inspect the fluid level in the master cylinder.
While a slight brake fluid level drop can be considered a normal condition due to brake lining wear, a very low level may indicate a brake fluid leak in the hydraulic system.
- If the fluid level is abnormally low, adjust the brake fluid level. Refer to Master Cylinder Reservoir Filling.
- Start the engine and allow it to idle.
- Apply constant, moderate foot pressure to the brake pedal.
If the brake pedal gradually falls away while under foot pressure, there may be a brake fluid leak.
- Turn the ignition OFF.
- Visually inspect the following brake system components for brake fluid leaks, excessive corrosion, and damage. Give particular attention to all brake pipe and flexible hose connections to ensure that there are not any slight brake fluid leaks - even though the brake pedal may feel firm and hold steady:
- Master cylinder brake pipe fittings
- All brake pipe connections
- Brake pipes
- Brake hoses and connections
- Brake calipers and/or wheel cylinders
- While slight dampness around the master cylinder reservoir can be considered acceptable, brake fluid leaking from any of the brake system components requires immediate attention. If any of these components exhibit signs of brake fluid leakage, repair or replace those components. After the repair or replacement, reinspect the hydraulic brake system to assure proper function.
BRAKE SYSTEM INTERNAL LEAK TEST
WARNING: Refer to Brake Fluid Irritant Warning .
CAUTION: Refer to Brake Fluid Effects on Paint and Electrical Components Caution
- Start the engine and allow it to idle.
- Apply light, steady pressure to the brake pedal. Observe both the brake pedal feel and travel.
- Release the brakes and turn the ignition OFF.
- If the brake pedal apply felt spongy, but the brake pedal travel was not excessive, perform the following steps:
- Inspect the brake system for external leaks. Refer to Brake System External Leak Inspection.
- Pressure bleed the brake system in order to purge any air that may be trapped in the system. Refer to Hydraulic Brake System Bleeding (Manual), Hydraulic Brake System Bleeding (Pressure).
.gif)
Fig. 5: Master Cylinder Inspection Points
- If the brake pedal apply did not feel spongy, but the brake pedal travel was excessive, perform the following steps:
- Loosen the master cylinder-to-vacuum brake booster retaining nuts.
- Carefully pull the master cylinder away from the vacuum brake booster just enough to inspect the mounting surface of the master cylinder.
- Inspect the master cylinder mounting surface at the primary piston (2) for brake fluid leaks.
- If the master cylinder exhibits any leakage around the primary piston (2), then the primary piston primary seal (4) and/or secondary seal (3) is leaking and the master cylinder requires overhaul or replacement.
- If the master cylinder primary piston (2) does not exhibit any leakage,
pressure bleed the brake system.
Refer to Hydraulic Brake System Bleeding (Manual), Hydraulic Brake System Bleeding (Pressure).
- If the brake pedal apply did not feel spongy, and the brake pedal travel was initially steady and not excessive, but then gradually fell, then the master cylinder requires overhaul or replacement due to an internal leak past the secondary piston (1) from the secondary piston primary seal (6) or secondary seal (5).
- If the brake pedal apply did not feel spongy, and the brake pedal travel was initially steady and not excessive, then fell slightly, then became steady again, then the brake pressure modulator valve (BPMV) may be leaking internally, and may require replacement.
Hydraulic brake component operation visual inspection
Disc Brake
.gif)
Fig. 6: Hydraulic Brake Component Operation
- With the tire and wheel assemblies removed and the brake rotors retained by wheel lug nuts, visually inspect the brake caliper piston dust boot (2) sealing area to ensure that there are no brake fluid leaks.
- If any evidence of a brake fluid leak is present, the brake caliper requires overhaul or replacement.
- While the brake system is at rest (4), observe the position of the brake caliper piston (1) in relation to the brake caliper housing.
- Have an assistant apply and release the brake pedal several times while you observe the operation of the hydraulic brake caliper.
- Observe the brake caliper piston (1) for unrestricted and even movement during each apply of the brake system (5).
- Observe the brake caliper piston (1) for an unrestricted and even return motion during each release of the brake system (6).
- If the brake caliper piston (1) did not exhibit unrestricted and even movement during brake system apply and/or release, the piston square seal (3) may be worn or damaged and the brake caliper may require overhaul or replacement.
Drum Brakes
.gif)
Fig. 7: Wheel Cylinder Piston Boot sealing Areas
- With the rear tire and wheel assemblies and the brake drums removed, visually inspect the wheel cylinder pistons boot sealing areas to ensure that there are no brake fluid leaks.
- If any evidence of a brake fluid leak is present, the brake wheel cylinder requires replacement.
- Using firm hand pressure, simultaneously and evenly apply force on both brake shoes in order to compress the wheel cylinder pistons into their bore.
- Evenly release the force from both brake shoes to allow the wheel cylinder pistons to return.
- If one or both of the wheel cylinder pistons did not exhibit unrestricted and even movement during apply and/or release of force, the wheel cylinder may require replacement.
BRAKE PIPE AND HOSE INSPECTION
WARNING: Refer to Brake Fluid Irritant Warning .
CAUTION: Refer to Brake Fluid Effects on Paint and Electrical Components Caution
- Visually inspect all of the brake pipes for the following conditions:
- Kinks, incorrect routing, missing or damaged retainers
- Leaking fittings, excessive corrosion
- If any of the brake pipes exhibited any of the conditions listed, then the identified pipe, or pipes, require replacement.
- Ensure that the vehicle axles are correctly supported at ride height in order to maintain the proper relationship of the flexible brake hoses to the chassis.
.gif)
Fig. 8: Flexible Brake Hose Inspection Points
- Visually inspect all of the flexible brake hoses for the following conditions:
- Kinks (1), improper routing, twists, chafing, missing or damaged retainers
- Leaking connections, perished, cracked, blistered, brittle or bulging hoses
- If any of the flexible brake hoses exhibited any of the conditions listed, then the identified flexible brake hose, or hoses require replacement.
- Squeeze the flexible brake hoses with firm finger pressure to inspect for soft spots (2), indicating an internal restriction. Inspect the entire length of each flexible brake hose.
- If any of the flexible brake hoses were found to have soft spots (2), then the identified flexible brake hose, or hoses require replacement.
BRAKE PEDAL PUSHROD INSPECTION
.gif)
Fig. 9: Inspecting Brake Pedal Pushrod
- Disconnect the brake pedal pushrod (2) from the brake pedal.
- Reposition the pedal pushrod boot (1) toward the front of the vehicle to expose as much of the pedal pushrod (2) as possible.
- Inspect the brake pedal pushrod (2) for straightness.
- If the brake pedal pushrod (2) is not straight, then the pushrod requires replacement.
- Return the pedal pushrod boot (1) to its original position on the pedal pushrod (2).
- Connect the brake pedal pushrod (2) to the brake pedal.
READ NEXT:
 Repair instructions
Master cylinder reservoir filling
WARNING: Refer to Brake Fluid Irritant Warning
CAUTION: Refer to Brake Fluid Effects on Paint and Electrical
Components Caution .
Visually inspect the brake fluid
Description and operation
Brake assist system description and operation
System Component Description
The brake assist system consists of the following:
Brake Pedal
Receives, multiplies and transfers brake system input force fr
SEE MORE:
Filling the Tank (Capless Fuel Fill)
An arrow on the fuel gauge
indicates which side of the vehicle
the fuel door is on. See Fuel Gauge
Warning
Fuel vapors and fuel fires burn
violently and can cause injury or
death.
Follow these guidelines to help
avoid injuries to you and others:
Read and follow all the
instructions on the fuel
Description and operation
DISC BRAKE SYSTEM DESCRIPTION AND OPERATION
System Component Description
The disc brake system consists of the following components
Disc Brake Pads
Applies mechanical output force from the hydraulic brake calipers to friction
surfaces of brake rotors.
Disc Brake Rotors
Uses mechanical output force
