Buick Encore: Repair instructions
Front wheel drive intermediate shaft replacement (LUV WITH MH8 OR MH5)
.gif)
Fig. 1: Front Wheel Drive Intermediate Shaft
Front Wheel Drive Intermediate Shaft Replacement (LUV with MH8 or MH5)
.jpg)
.jpg)
FRONT WHEEL DRIVE INTERMEDIATE SHAFT BRACKET REPLACEMENT (LUV WITH MH8 OR MH5)
.gif)
Fig. 2: Front Wheel Drive Intermediate Shaft Bracket
Front Wheel Drive Intermediate Shaft Bracket Replacement (LUV with MH8 or MH5)
.jpg)
.jpg)
FRONT WHEEL DRIVE INTERMEDIATE SHAFT BEARING REPLACEMENT (LUV WITH MH8 OR MH5)
.gif)
Fig. 3: Front Wheel Drive Intermediate Shaft Bearing
Front Wheel Drive Intermediate Shaft Bearing Replacement (LUV with MH8 or MH5)
.jpg)
.jpg)
FRONT WHEEL DRIVE SHAFT REPLACEMENT - LEFT SIDE
Special Tools
- J 45859 Hub Spindle Remover
- DT 6332 Seal Tool
Fro regional special tools, refer to Special Tools.
Removal Procedure
- Raise and support the vehicle. Refer to Lifting and Jacking the Vehicle .
- Remove the tire and wheel assembly. Refer to Tire and Wheel Removal and Installation .
- Remove the front compartment front center insulator, if equipped. Refer to Front Compartment Front Center Insulator Replacement .
.gif)
Fig. 4: Removing Stake From Wheel Drive Shaft Nut
- Using a suitable tool (2) and a hammer (3), remove the stake from the wheel drive shaft nut (1).
.gif)
Fig. 5: Inserting Drift Or Punch In Brake Rotor Cooling Vanes
- Insert a drift or punch (2) in the cooling vanes of the brake rotor.
- Using a breaker bar and the proper size socket (1), loosen the wheel drive shaft nut.
.gif)
Fig. 6: Wheel Drive Shaft Nut
- Remove and discard the wheel drive shaft nut (1). Replace with NEW only.
- Remove the and relocate the front brake caliper assembly. Refer to Front Brake Caliper Replacement
.gif)
Fig. 7: Wheel Drive Shaft Removal Tool
- Using the J-45859 remover (1), separate the wheel drive shaft from the front wheel bearing/hub assembly.
- Remove the stabilizer shaft link from the front strut. Refer to Stabilizer Shaft Link Replacement .
- Remove the outer tie rod end from the steering knuckle. Refer to Steering Linkage Outer Tie Rod Replacement .
- Remove the lower control arm bolt from the steering knuckle. Refer to Lower Control Arm Replacement .
.gif)
Fig. 8: Positioning Screw Driver Against Tripot Housing
- Position a long screw driver (1) against the tripot housing (2).
- Using the long screw driver (1), remove the wheel driver shaft from the transmission.
.gif)
Fig. 9: Wheel Drive Shaft
- Remove the wheel drive shaft (1) from the vehicle.
.gif)
Fig. 10: Wheel Drive Shaft And Washer
NOTE: If there is no washer on the wheel drive shaft, install a NEW washer.
- Remove and discard the washer (1) from the wheel drive shaft (2). Do not re-use the washer, replace with NEW only.
Installation Procedure
.gif)
Fig. 11: Protector Tool
- Position the DT 6332 tool (1) in the transmission.
- Install the wheel drive shaft until the wheel drive shaft splines are past the axle seal.
- Remove the DT 6332 tool (1) from the wheel drive shaft.
.gif)
Fig. 12: Wheel Drive Shaft
- Install the wheel drive shaft (1) until it is fully seated in the transmission.
- Install the wheel drive shaft to the front wheel hub/bearing.
- Install the lower control arm ball joint bolt to the steering knuckle. Refer to Lower Control Arm Replacement .
- Install the stabilizer shaft link to the front strut. Refer to Stabilizer Shaft Link Replacement .
- Install the outer tie rod to the steering knuckle. Refer to Steering Linkage Outer Tie Rod Replacement .
- Install the front brake caliper assembly. Refer to Front Brake Caliper Replacement
.gif)
Fig. 13: Wheel Drive Shaft And Nut
- Install the NEW wheel drive shaft nut (2) to the wheel drive shaft spindle (1).
.gif)
Fig. 14: Inserting Drift Or Punch In Brake Rotor Cooling Vanes
- Insert a drift or punch (2) in the cooling fins of the brake rotor.
CAUTION: Refer to Fastener Caution .
- Using the proper size socket and torque wrench (1), tighten the NEW wheel drive shaft nut to:
- First Pass 50 (37 lb ft)
- Final Pass plus 60 degrees
.gif)
Fig. 15: Splitting Center Of Wheel Drive Shaft Nut
NOTE: Evenly split the center of the wheel drive shaft nut (3) and ensure that it is fully staked. Each side of the stake should be in contact and approximately 45 degrees to each side of the slot in the wheel drive shaft.
- Using the punch (1) and the hammer (2), stake the wheel drive shaft nut (3) collar into the slot on the wheel drive shaft.
.gif)
Fig. 16: Front Suspension Skid Plate And Bolts
- Install the front suspension skid plate (2).
- Install the front compartment front center insulator, if equipped. Refer to Front Compartment Front Center Insulator Replacement .
- Install the tire and wheel assembly. Refer to Tire and Wheel Removal and Installation .
- Remove the support and lower the vehicle.
Front wheel drive shaft replacement - right side
Special Tools
J 45859 Hub Spindle Remover
Fro regional special tools, refer to Special Tools.
Removal Procedure
- Raise and support the vehicle. Refer to Lifting and Jacking the Vehicle .
- Remove the tire and wheel assembly. Refer to Tire and Wheel Removal and Installation .
.gif)
Fig. 17: Front Suspension Skid Plate And Bolts
- Remove the front compartment front center insulator (2), if equipped. Refer to Front Compartment Front Center Insulator Replacement .
.gif)
Fig. 18: Removing Stake From Wheel Drive Shaft Nut
- Using a suitable tool (2) and a hammer (3), remove the stake from the wheel drive shaft nut (1).
.gif)
Fig. 19: Inserting Drift Or Punch In Brake Rotor Cooling Vanes
- Insert a drift or punch (1) in the cooling vanes of the brake rotor.
- Using a breaker bar and the proper size socket (2), loosen the wheel drive shaft nut.
.gif)
Fig. 20: Wheel Drive Shaft Nut
- Remove and discard the wheel drive shaft nut (1). Replace with NEW only.
- Remove and relocate the front brake caliper assembly. Refer to Front Brake Caliper Replacement
.gif)
Fig. 21: Wheel Drive Shaft Removal Tool
- Using the J-45859 remover (1), separate the wheel drive shaft from the front wheel bearing/hub assembly.
- Remove the stabilizer shaft link from the front strut. Refer to Stabilizer Shaft Link Replacement .
- Remove the outer tie rod end from the steering knuckle. Refer to Steering Linkage Outer Tie Rod Replacement .
- Remove the lower control arm bolt from the steering knuckle. Refer to Lower Control Arm Replacement .
.gif)
Fig. 22: Removing Wheel Drive Shaft
- Using a long screw driver (1) and using mounting bracket (3) ,for leverage. Apply force against the inner tripot joint to remove the wheel drive shaft (2) from the transfer case or the intermediate drive shaft.
.gif)
Fig. 23: Wheel Drive Shaf
- Remove the wheel drive shaft (1) from the vehicle.
.gif)
Fig. 24: Wheel Drive Shaft And Washer
NOTE: If there is no washer on the wheel drive shaft, install a NEW washer.
- Remove and discard the washer (1) from the wheel drive shaft (2). Do not re-use the washer, replace with NEW only.
Installation Procedure
.gif)
Fig. 25: Wheel Drive Shaft
- Install the wheel drive shaft (1) until it is fully seated in the transfer case.
- Install the wheel drive shaft to the front wheel hub/bearing.
- Install the lower control arm ball joint bolt to the steering knuckle. Refer to Lower Control Arm Replacement .
- Install the stabilizer shaft link to the front strut. Refer to Stabilizer Shaft Link Replacement .
- Install the outer tie rod to the steering knuckle. Refer to Steering Linkage Outer Tie Rod Replacement .
- Install the front brake caliper assembly. Refer to Front Brake Caliper Replacement
.gif)
Fig. 26: Wheel Drive Shaft Nut
- Install the NEW wheel drive shaft nut (1) to the wheel drive shaft.
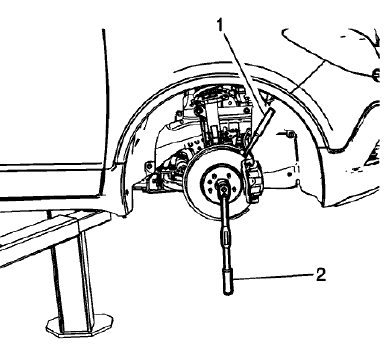
Fig. 27: Inserting Drift Or Punch In Brake Rotor Cooling Vanes
- Insert a drift or punch (1) in the cooling fins of the brake rotor.
CAUTION: Refer to Fastener Caution .
- Using the proper size socket and torque wrench (2), install the NEW wheel drive shaft.
Tighten
- First Pass 50 (37 lb ft)
- Final Pass plus 60 degrees
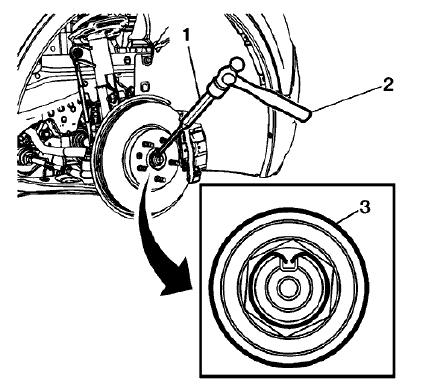
Fig. 28: Splitting Center Of Wheel Drive Shaft Nut
NOTE: Evenly split the center of the wheel drive shaft nut (3) and ensure that it is fully staked. Each side of the stake should be in contact and approximately 45 degrees to each side of the slot in the wheel drive shaft.
- Using the punch (1) and the hammer (2), stake the wheel drive shaft nut (3) collar into the slot on the wheel drive shaft.
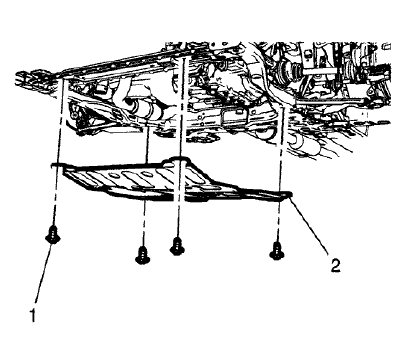
Fig. 29: Front Suspension Skid Plate And Bolts
- Install the splash shield cover (2), if equipped.
- Install the tire and wheel assembly. Refer to Tire and Wheel Removal and Installation .
- Remove the support and lower the vehicle.
Rear wheel drive shaft replacement
Special Tools
CH-45859 Axle Remover
For regional equivalent tools, refer to Special Tools.
Removal Procedure
- Raise and support the vehicle. Refer to Lifting and Jacking the Vehicle .
- Remove the tire and wheel assembly. Refer to Tire and Wheel Removal and Installation .
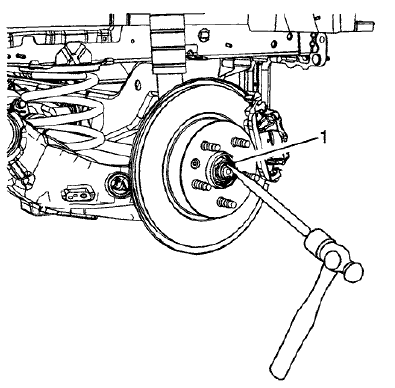
Fig. 30: Removing Stake From Rear Wheel Drive Shaft
- Using a hammer and a punch, remove the stake (1) from the rear wheel drive shaft.
- With the aid of an assistant, apply the brakes.
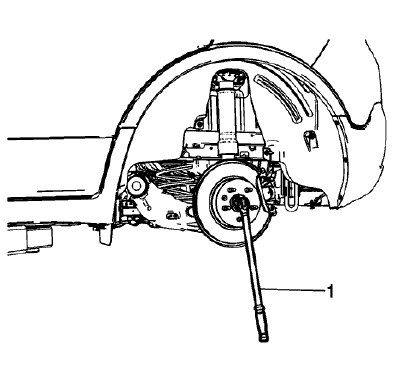
Fig. 31: Loosening Wheel Drive Shaft Nut
CAUTION: Make sure that the wheel drive shaft nut is fully un-staked to avoid damage to the wheel drive shaft threads during the removal of the wheel drive shaft nut. Failure to follow these instructions could result in wheel, nut, and/or stud damage.
- Using a breaker bar and the proper size socket (1), loosen the wheel drive shaft nut.
- Remove and relocate the rear brake caliper assembly. Refer to Rear Brake Caliper Replacement
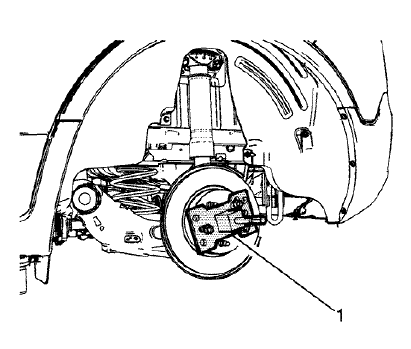
Fig. 32: Separating Wheel Drive Shaft From Wheel Bearing/Hub
- Using the CH-45859 remover (1), separate the wheel drive shaft from the wheel bearing/hub assembly.
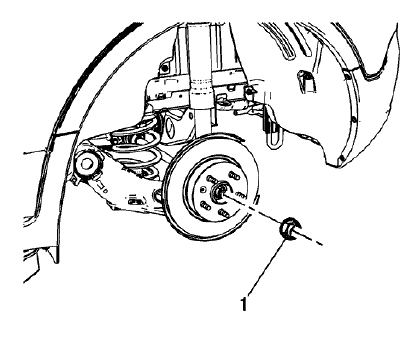
Fig. 33: Wheel Drive Shaft Nut
- Remove and discard the wheel drive shaft nut (1) from the wheel drive shaft. Replace with NEW nut only.

Fig. 34: Wheel Drive Shaft Bolts
- Remove the 3 wheel drive shaft bolts (1).
.gif)
Fig. 35: Wheel Drive Shaft
- Remove the wheel drive shaft (1).
Installation Procedure
.gif)
Fig. 36: Wheel Drive Shaft
- Position the wheel drive shaft (1) in the vehicle.
.gif)
Fig. 37: Wheel Drive Shaft Bolts
CAUTION: Refer to Fastener Caution .
- Install and tighten the 3 wheel drive shaft bolts (1) to 58 (43 lb ft)
.gif)
Fig. 38: Wheel Drive Shaft Nut
- Install the wheel drive shaft nut (1).
- Install the rear brake caliper assembly. Refer to Rear Brake Caliper Replacement
- With the aid of an assistant, apply the brakes
.gif)
Fig. 39: Torque Wrench And Wheel Drive Shaft Nut
- Using the proper size socket and torque wrench (1), tighten the wheel drive shaft nut to:
- First Pass 50 (37 lb ft)
- Final Pass plus 60 degrees
.gif)
Fig. 40: Splitting Center Of Wheel Drive Shaft Nut
NOTE: Evenly split the center of the wheel drive shaft nut (2) and ensure that it is fully staked. Each side of the stake should be in contact and approximately 45 degrees to each side of the slot in the wheel drive shaft.
- Using the punch (1) and hammer, stake the wheel drive shaft nut (2) collar into the slot on the wheel drive shaft.
- Install the tire and wheel assembly. Refer to Tire and Wheel Removal and Installation .
- Remove the support and lower the vehicle.
Front wheel drive shaft inner joint and boot replacement
Special Tools
- CH-48894 Wheel Drive Shaft Boot Clamp Pliers
- DT-35910 Drive Axle Boot Clamp Pliers
For equivalent regional tools, refer to Special Tools.
Disassemble Procedure
- Remove the wheel drive shaft from the vehicle. Refer to Front Wheel Drive Shaft Replacement - Left Side, and Front Wheel Drive Shaft Replacement - Right Side.
.gif)
Fig. 41: View Of Front Wheel Drive Shaft Inner Joint
- Install the wheel drive shaft (1) in a soft jawed vise.
.gif)
Fig. 42: View Of Wheel Drive Shaft Components
- Using a pair of side cutters, remove and discard the small boot clamp (4) from the boot (3).
- Using the appropriate tool, remove and discard the large boot clamp (2) from the boot (3).
.gif)
Fig. 43: Inner Tripot Housing
- Remove the boot (4) and the boot adaptor (3) from the from the tripot housing (1).
- Using a bronze bar and hammer, remove the inner tripot housing (1) from the wheel drive shaft (2).
.gif)
Fig. 44: View Of Tripot Spider & Retaining Ring
- Using the appropriate tool, remove the outer tripot spider retaining ring (1) from the wheel drive shaft (5).
- Remove the tripot spider (2) from the wheel drive shaft (5).
- Using the appropriate tool, remove the inner tripot retaining ring (3), if equipped, from the wheel drive shaft (5).
- Remove the wheel drive shaft boot (4) from the wheel drive shaft (5).
Assemble Procedure
.gif)
Fig. 45: Identifying Groove In Wheel Drive Shaft
- Install the boot (1) on the wheel drive shaft (3).
- Ensure that the boot (1) is properly seated in the groove (2) in the wheel drive shaft.
.gif)
Fig. 46: View Of Tripot Spider & Retaining Ring
- Using the appropriate tool, install the inner tripot retaining ring (3), if equipped.
NOTE: Position the chamfer of tripot spider toward the wheel drive shaft boot.
- Install the tripot spider (2) until just touches the shoulder on the wheel drive shaft (5).
- Using the appropriate tool, install the outer tripot spider retaining ring (1).
.gif)
Fig. 47: Identifying Pliers Breaker Bar, Torque Wrench, Ratchet & Gap
Measurement
- Using the DT-35910 pliers with a ratchet wrench and a breaker bar (1), close the boot clamp (2) until the gap (3) measures 1.9 mm (0.07 in).
.gif)
Fig. 48: Inner Tripot Housing
- Install the tripot housing (1) on the wheel drive shaft (2) using a block of wood and a hammer.
- Install the boot adaptor (3) and the wheel drive shaft boot (4) on the tripot housing (1).
.gif)
Fig. 49: Place Approximately Half Container Of Grease From Service Kit In
Boot And Then Half In Tripod Housing
- Place approximately half of the lubricant (2) in the boot (1) and the remaining half in the tripot housing (3).
.gif)
Fig. 50: Latching Large Seal Retaining Clamp
NOTE: Ensure that the boot clamp (3) is properly positioned around the entire circumference of the boot (2).
- Using the CH-48894 pliers (1), close the boot clamp (3).
- Remove any of the excess lubricant from the tripot housing and wheel drive shaft.
- Move the tripot joint housing in a circular motion to distribute the lubricant in the tripot housing.
- Remove the wheel drive shaft from the vise.
- Install the wheel drive shaft in the vehicle. Refer to Front Wheel Drive Shaft Replacement - Left Side, and Front Wheel Drive Shaft Replacement - Right Side.
Front wheel drive shaft outer joint and boot replacement
Special Tools
DT-35910 Drive Axle Boot Clamp Pliers
For equivalent regional tools, refer to Special Tools
Disassemble Procedure
- Remove the wheel drive shaft from the vehicle. Refer to Front Wheel Drive Shaft Replacement - Left Side, and Front Wheel Drive Shaft Replacement - Right Side.
.gif)
Fig. 51: View Of Front Wheel Drive Shaft Inner Joint
- Install the drive axle shaft (1) in a soft jawed vice.
.gif)
Fig. 52: Drive Shaft Boot Clamps
CAUTION: Do not cut through the wheel drive shaft inboard or outboard boot during service. Cutting through the boot may damage the sealing surface of the housing and the tripot or the constant velocity joint bushing. Damage to the sealing surface may lead to water and dirt intrusion and premature wear of the constant velocity joint.
- Using a pair of side cutters, remove the outer boot clamp (1) and the inner boot clamp (2).
- Discard the boot clamps (1) and (2). Use NEW clamps only.
.gif)
Fig. 53: Wheel Drive Shaft, Inner Race And CV Joint
- Remove the CV joint (2) from the wheel drive shaft (1) while tapping the inner race (3) using a bronze bar and a hammer.
.gif)
Fig. 54: View Of Axle Shaft Retaining Ring
- Using the appropriate tool, remove and discard the retaining clip.
.gif)
Fig. 55: Identifying Clamp & Wheel Drive Shaft
- Remove the boot (1) from the wheel drive shaft (2).
- Inspect the outer CV joint for damage and wear. Refer to Wheel Drive Shaft Outer Joint Inspection.
Assemble Procedure
.gif)
Fig. 56: Identifying Clamp & Wheel Drive Shaft
- Position the boot (1) on the wheel drive shaft (2).
.gif)
Fig. 57: View Of Axle Shaft Retaining Ring
- Using the appropriate tool, install the NEW retaining clip.
.gif)
Fig. 58: Identifying Groove In Wheel Drive Shaft
- Ensure that the boot (1) is properly seated in the grooved (2) wheel drive shaft (3).
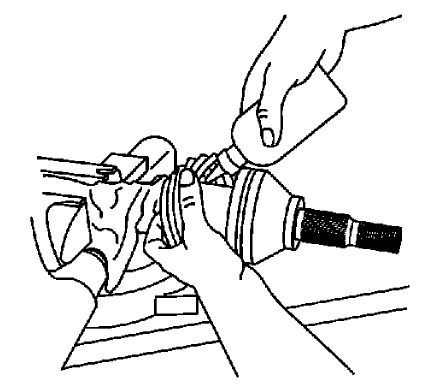
Fig. 59: Inserting Remaining Grease From Service Kit Into Seal
- Place approximately half the lubricant from the service kit inside the outboard boot and pack the CV joint with the remaining lubricant.
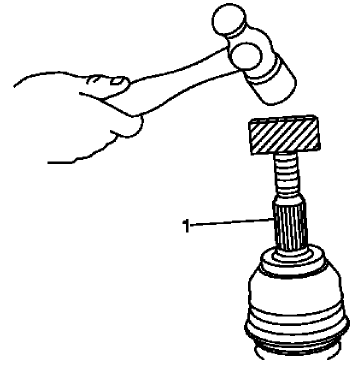
Fig. 60: Installing CV Joint
- Using a block of wood and a hammer, install the CV joint (1) on the wheel drive shaft.
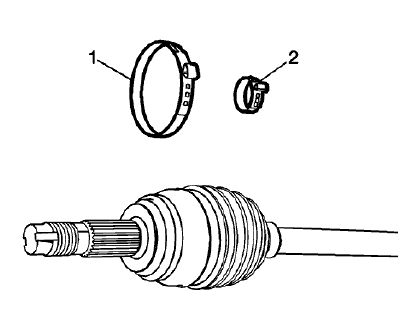
Fig. 61: Drive Shaft Boot Clamps
- Install the inner boot clamp (2) and the outer boot clamp (1).
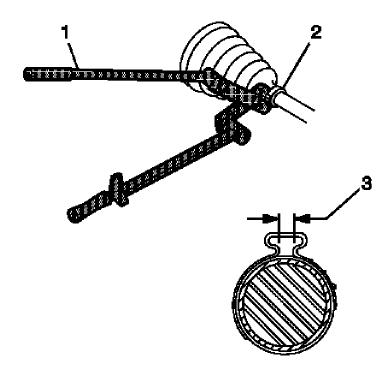
Fig. 62: Identifying Pliers Breaker Bar, Torque Wrench, Ratchet & Gap
Measurement
NOTE: Ensure that the boot clamp is properly positioned around the entire circumference of the boot.
- Using the DT-35910 pliers and a torque or ratchet wrench and breaker bar (1), close the boot clamp (2) until the gap (3) measures 1.9 mm (0.07 in).
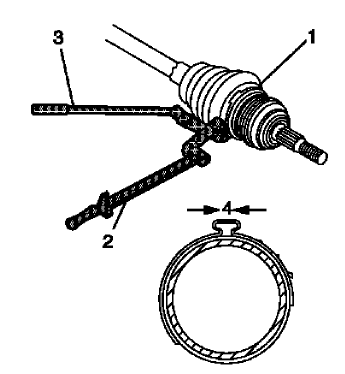
Fig. 63: View Of Outboard Seal, Large Seal Retaining Clamp & CV Joint Outer
Race
- Using the DT-35910 pliers and a torque or ratchet wrench (2) and breaker bar (3), close the boot clamp (1) until the gap (4) measures 1.7 mm (0.06 in).
- Distribute the lubricant within the outer CV joint by moving it in a circular motion at least four to five times.
- Remove the wheel drive shaft from the bench vise.
- Install the wheel drive shaft assembly. Refer to Front Wheel Drive Shaft Replacement - Left Side, and Front Wheel Drive Shaft Replacement - Right Side.
Wheel drive shaft outer joint inspection
Disassembly Procedure
- Remove the outer constant velocity (CV) joint and boot from the wheel drive shaft. Refer to Front Wheel Drive Shaft Outer Joint and Boot Replacement.
- Remove any lubricant from the CV joint.
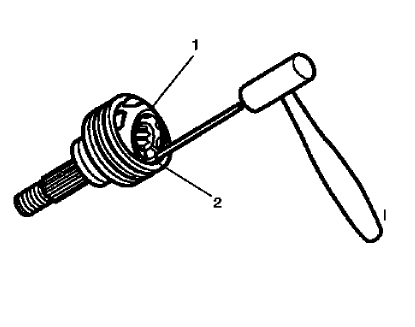
Fig. 64: Taping Gently On Brass Drift With A Hammer In Order To Tilt Cage
NOTE: Position the cage and the inner race so they are level.
- Install the outer CV joint assembly in a soft jawed vise.
NOTE: The following procedure will have to be repeated until all the ball bearing are removed from the cage.
- Using a brass drift (1), gentle tap the cage (2) until the ball bearing can be removed from the cage (2).
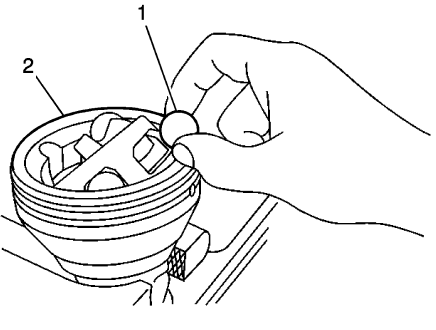
Fig. 65: Removing/Install Ball From Cage & Inner Race
- Using a small screwdriver, remove the ball bearings (1) from the CV joint (2).
Fig. 66: View Of Ball Removal/Installation Sequence
- Remove the ball bearings from the CV joint in sequence.
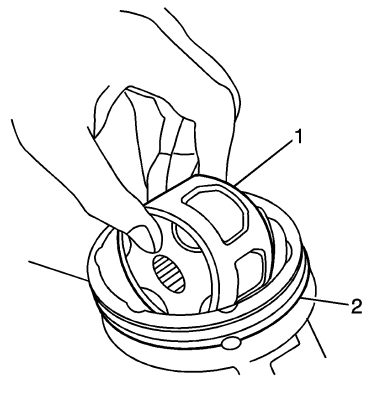
Fig. 67: Positioning Cage & Inner Race 90 Degrees To Centerline Of Outer Race
NOTE: Position the cage so that the larger radius corners of the cage windows are facing up.
- Position the cage (1) at a 90 degrees to the centerline of the outer race (2).
- Align the cage windows with the lands of the outer race (2).
- Lift and remove the cage (1) and the inner race from the outer race (2).
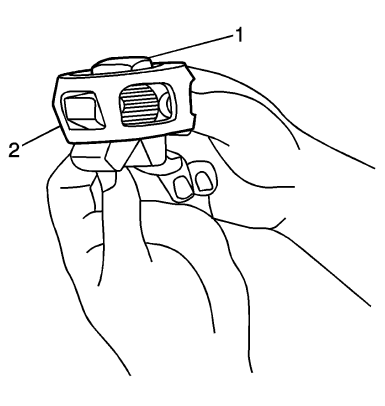
Fig. 68: Positioning Cage So Larger Radius Corners Of Cage Windows Are Up
- Position the cage (2) and the inner race (1) so that the larger radius corners of the cage windows are up.
- Rotate the inner race (1) 90 degrees to the center line of the cage (2).
- Align the lands of the inner race (1) with the windows of the cage (2).
- Move the inner race (1) land into the cage window (2).
- Rotate the inner race (1) down and remove it from the cage (2).
- Clean the following items thoroughly with the proper cleaning solvent:
- The inner race
- The outer race
- The cage
- The ball bearings
- The exposed end of the wheel drive shaft
NOTE: The internal parts of the CV joint are NOT SERVICED separately. The outer CV joint is serviced as an assembly.
- If any of the above items are found to have excessive wear or are damaged, replace the outer CV joint as an assembly.
Assembly Procedure
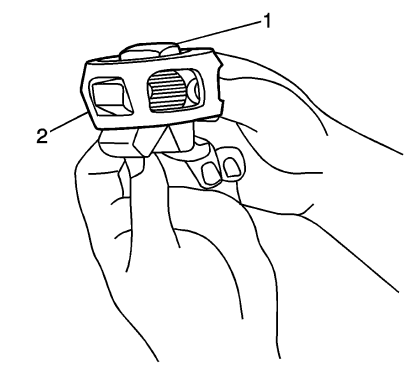
Fig. 69: Positioning Cage So Larger Radius Corners Of Cage Windows Are Up
- Position the cage (2) so that the larger radius corners of the cage windows are up.
- Position the inner race (1) 90 degrees to the centerline of the cage (2).
- Insert the inner race (1) through the bottom of the cage (2).
- Align the lands of the inner race (1) with the windows of the cage (2).
- Move the inner race (1) land into the cage window (2).
- Rotate the inner race (1) down and remove it from the cage (2).
- Rotate the inner race (1) within the cage (2) so that the grooved surface of the inner race (1) is facing up.
- Align the inner race (1) ball bearing tracks with the cage (2) windows.
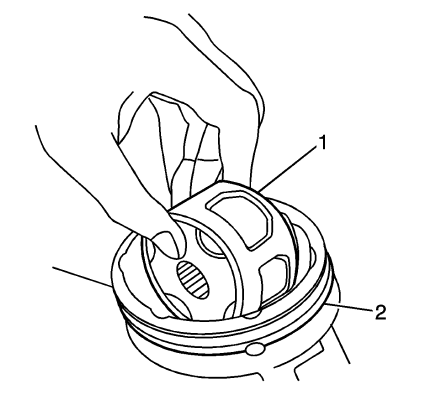
Fig. 70: Positioning Cage & Inner Race 90 Degrees To Centerline Of Outer Race
- Wrap a clean shop towel around the CV joint outer race spined shaft.
- Place the outer race (2) vertically in a bench vise.
- Position the cage (1) and the inner race at a 90 degrees to the centerline of the outer race (2).
- With the inner race and the cage (1) assembly in a vertical position, insert the cage and the inner race into the outer race (2).
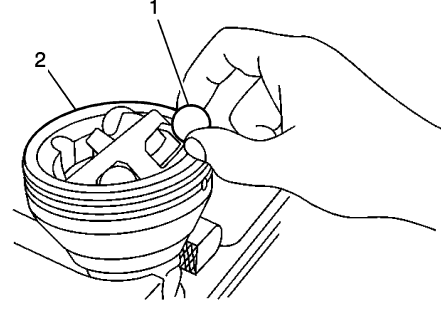
Fig. 71: Removing/Install Ball From Cage & Inner Race
NOTE: The larger radius corners of the cage windows should be positioned up and the grooved surface of the inner race should be visible.
- Position the cage (2) and the inner race so that they are level in the vise.
- Rotate the appropriate component(s), and align the cage windows and the inner race ball bearing (1) tracks with the outer race ball bearing tracks.
- Position a cage window and the inner race ball bearing track for the ball bearing installation.
NOTE: When performing the following procedure, the opposing cage (2) window and the inner ball bearing (1) track will be accessible for the ball bearing installation.
- Press down on the cage following one of the outer race ball bearing (1) tracks.
- Install the ball bearing through the cage window onto the inner race ball bearing (1) track.
NOTE: The following service procedure will have to be performed after each ball bearing (1) has been installed.
- After the first ball bearing (1) has been installed, use a brass drift and a hammer and gently tap the cage in order to drive the cage and the inner race down completely in the outer race.
NOTE: After the ball bearing (1) has been installed, there should be NO GAP between the ball bearing and the inner race.
- Position the cage and the inner race so that they are level.
- Using a plastic hammer, lightly tap the ball bearing (1) into place.
Fig. 72: View Of Ball Removal/Installation Sequence
- Install the ball bearings in sequence.
- Repeat steps 18 thru 20 until all the ball bearings are installed.
- Install the outer CV joint and boot on the wheel drive shaft. Refer to Front Wheel Drive Shaft Outer Joint and Boot Replacement.
Wheel drive shaft inner joint inspection
Inspection Procedure
- Remove the front wheel drive shaft inner joint and boot. Refer to Front Wheel Drive Shaft Inner Joint and Boot Replacement.
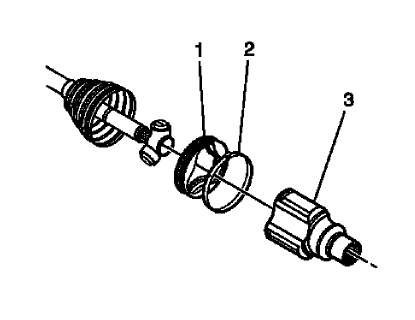
Fig. 73: Identifying Wheel Drive Shaft Inner Joint Inspection Areas
- Remove the wheel drive shaft tripod bushing (1) from the tripod housing (3).
- Remove the wheel drive shaft tripod housing (3) from the wheel drive shaft.
- Remove the wheel drive shaft tripod joint boot bushing (1).
- Using a suitable cleaner, remove the excess grease from the tripod assembly.
- Inspect the following items for damage or excessive wear:
- The wheel drive shaft tripod boot
- The wheel drive shaft tripod assembly
- The wheel drive shaft tripod joint housing
- The wheel drive shaft tripod joint bushing
- The wheel drive shaft
READ NEXT:
 Description and operation
WHEEL DRIVE SHAFTS DESCRIPTION AND OPERATION
Front wheel drive axles are flexible assemblies.
Front wheel drive axles consist of the following components:
A front wheel drive shaft tripot joint (in
Buick Wheel Alignment Specifications
WHEEL ALIGNMENT SPECIFICATIONS
ENCLAVE
ENCLAVE w/o QPR
ENCLAVE w/QPR
ENCORE
ENCORE All Models
LACROSSE
LaCROSSE GNA Base Suspension
LaCROSSE GNB Performance Suspension
REGAL
REGAL GNA Ba
SEE MORE:
Service programming system (SPS)
Special Tools
EL-49642 SPS Programming Support Tool
For equivalent regional tools, refer to Special Tools.
For step-by-step control module programming instructions, please refer to the
techline information system (TIS)
terminal.
Review the information below to ensure proper programming protocol.
N
Distracted Driving
Distraction comes in many forms
and can take your focus from the
task of driving. Exercise good
judgment and do not let other
activities divert your attention away
from the road. Many local
governments have enacted laws
regarding driver distraction. Become
familiar with the local laws in
your area.
