Buick Encore: Special tools and equipment
SPECIAL TOOLS
.jpg)
.jpg)
.jpg)
.jpg)
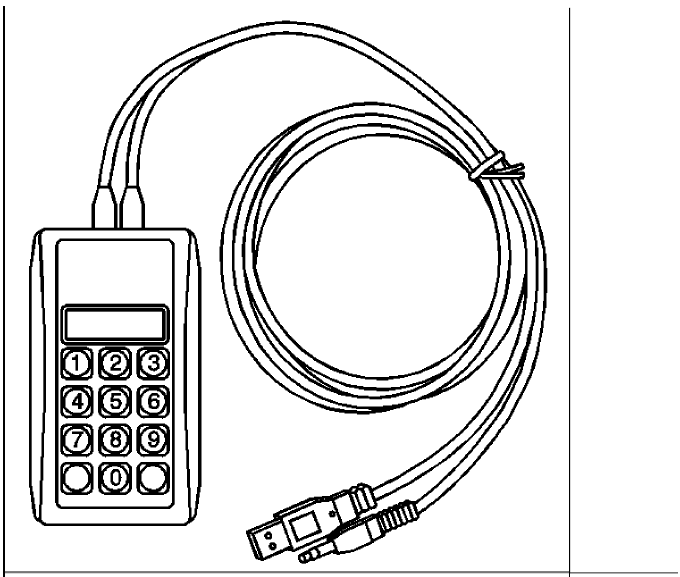
SPECIAL TOOLS (MIT TOOL INSTRUCTIONS)
Bluetooth Pairing for Vehicles with Radio RPO: UF7
Either reset the pin code on the radio to 0000, or go under Device Info on the radio and see what the pin code is (to enter it later on the MIT).
- Turn the BT discoverable ON in the radio Bluetooth settings.
- Press Pair Device on radio (DO NOT PRESS SEARCH BLUETOOTH DEVICES ON THE RADIO).
- Press the Pair button on the MIT.
- When the three LED lights begin flashing on the MIT, enter the pin code (either 0000 if you reset it to that or what the radio pin code was).
- MIT will then automatically connect with the radio and should show "MIT Connected" message.
Make test call and the audio streaming test.
Holden Radio Bluetooth Pairing Instructions
- Using the radio controls, place the radio into "Discoverable Mode".
- Place the MIT into Bluetooth mode by pressing TEST SELECTOR until the Bluetooth LED is illuminated.
- With the MIT in Bluetooth mode Press and Release the #1 button (the Bluetooth LED will begin to slowly blink).
- Now Press and release the PAIR/CALL button on the MIT (the Bluetooth LED will begin to blink a little faster).
- On the radio Enter the PASSKEY when prompted: (press "0000" then Press "OK").
- The MIT and radio will PAIR and CONNECT (the Bluetooth LED will be Fast Flashing).
- Use as regular MIT at this point.
For all other Radios
Testing the Bluetooth Function
- Verify connection of the MIT to the USB port.
- Press and release the TEST SELECTOR button until the Bluetooth LED illuminates.
- Disable all other Bluetooth devices present in the vehicle (ie. cell phones, laptops, etc.).
Standard Bluetooth Pairing/Bonding
- Use the vehicle controls to place the radio into Bluetooth Pairing mode. The vehicle will prompt you with a security code.
- Press and release the PAIR/CALL button. The Bluetooth LED will blink slowly while preparing to have a security code entered.
- Wait for the all three LEDs to blink confirming it is ready to have the security code entered.
- Enter the code with the MIT keypad and hit ENTER.
- The Bluetooth LED will blink slowly while pairing/bonding and move to a quick flash once paired/bonded.
The vehicle should confirm pairing/bonding is complete.
Streaming Audio
- Confirm pairing/bonding is complete - the Bluetooth LED will be in a quick flash mode.
- On some radios the MIT automatically begins streaming audio via A2DP. The audio playback will confirm that the Bluetooth connection using streaming and the audio is working correctly.
- On other radios you will need to select Bluetooth Audio from the Source menu to verify Audio Streaming.
- Audio playback confirms that the Bluetooth connection using Streaming Audio is working correctly.
- Placing a test call will temporarily stop the streaming audio function, but upon disconnection of that test call,
the streaming audio from the MIT will resume.
To Place a Test Call
- Confirm pairing/bonding is complete - the Bluetooth LED will be in a quick flash mode. If the vehicle is equipped with streaming audio, and the radio is set to play a Bluetooth audio file, the streaming audio playback will be audible.
- Press and release PAIR/CALL button to place a test call. Streaming audio will be temporarily turned off.
- Use the vehicle controls to answer the call.
NOTE: If the call is not answered within several rings, the MIT's audio files will not transmit, even though an active call is occurring.
- Audio playback confirms that the Bluetooth connectivity is working correctly.
NOTE: The MIT will remain paired/bonded when the call is ended by the vehicle.
To re-test the call function, place the MIT in Bluetooth mode and press and release the Pair button to reconnect. When testing is completed, delete MIT from the audio system before returning the vehicle to the customer.
- Use the vehicle controls to end the call. If applicable, streaming audio will resume.
Testing the AUX/LiAudio playback confirms that the USB is working correctly.ne-In Function
- Verify connection of the MIT as stated above.
- Press and release the TEST SELECTOR button until the MIT AUX LED illuminates.
- Use the vehicle controls to put the audio system into Audio (Line-In) mode.
- Audio playback confirms that the audio input is working correctly.
Testing the USB Function
- Verify connection of the MIT as stated above.
- Press and release the TEST SELECTOR button until the MIT USB LED illuminates.
- Use the vehicle controls to put the audio system into USB mode.
NOTE: Volume levels may vary dependent upon vehicle audio system.
Troubleshooting Guide
If the MIT unit is still not working properly after following the below troubleshooting, the unit is malfunctioning and should be repaired or replaced.
Unit not Working
- Verify the MIT is powered on correctly as indicated by the green Power LED.
- If Power LED is not illuminated, verify USB power source is working properly.
- If USB power adapter is being used to power the MIT, check and, if necessary, replace the fuse in adapter.
Problem with Aux/Line-In Test
- Verify Aux/Line- In test cable is inserted properly into the vehicle audio input jack. Verify the MIT is in Aux/Line-In mode as indicated by the red AUX LED.
- Verify the vehicle audio system is in Auxiliary or Line-in mode. Verify the vehicle audio system volume is turned up and not in mute mode.
Problem with USB Test
- Verify MIT is in USB mode as indicated by the red USB LED. Verify the vehicle audio system is in USB mode.
- Verify the vehicle audio system volume is turned up and not in mute mode.
Problem with Bluetooth Pairing
- Delete previous devices stored in the device list of the radio and the pair the MIT
- Remove USB cable, and then reconnect to reset the MIT. Carefully follow the bonding instructions for the correct Passkey procedure.
Problem with Bluetooth Test Call Audio
- Verify the MIT is paired with the vehicle. This is indicated by the quick flashing Bluetooth LED.
- Audio system should have indicated the MIT is bonded.
READ NEXT:
 Schematic wiring diagrams
SPECIFICATIONS
AMBIENT AIR TEMPERATURE SENSOR RESISTANCE
Ambient Air Temperature Sensor Resistance
SCHEMATIC WIRING DIAGRAMS
INSTRUMENT CLUSTER WIRING SCHEMATICS (ENCORE)
Power, Ground, Serial Data,
Displays and Gauges - Repair instructions
AMBIENT AIR TEMPERATURE SENSOR REPLACEMENT
Fig. 9: Ambient Air Temperature Sensor
Ambient Air Temperature Sensor Replacement
DRIVER INFORMATION DISPLAY REPLACEMENT (UAG)
Fig. 10: Driver Informat
SEE MORE:
Remote functions - Description and operation
KEYLESS ENTRY SYSTEM DESCRIPTION AND OPERATION
The keyless entry system is a vehicle entry device. The keyless entry system
is used in conjunction with the
door locks to unlock the vehicle. Keyless entry will lock/unlock the vehicle
doors or open the rear compartment
lid when a corresponding butto
Repair instructions
Steering linkage inner tie rod inspection
Special Tools
GE-8001 Dial Indicator Set
For equivalent regional tools, refer to Special Tools.
NOTE: This inspection procedure does not supersede local government
required
inspections that have more stringent requirements.
Turn the ignition key to the ON
