Buick Encore: Windshield garnish molding replacement (encore)

Fig. 22: Windshield Garnish Molding Assembly
Windshield Garnish Molding Replacement (Encore)

WINDSHIELD GARNISH MOLDING REPLACEMENT (Encore)

Fig. 23: Windshield Garnish Molding Assembly
Windshield Garnish Molding Replacement (Encore)

CENTER PILLAR UPPER TRIM PANEL REPLACEMENT (ENCORE)

Fig. 24: Center Pillar Upper Trim Panel Assembly
Center Pillar Upper Trim Panel Replacement (Encore)


CENTER PILLAR UPPER TRIM PANEL REPLACEMENT (Encore)

Fig. 25: Center Pillar Upper Trim Panel Assembly
Center Pillar Upper Trim Panel Replacement (Encore)


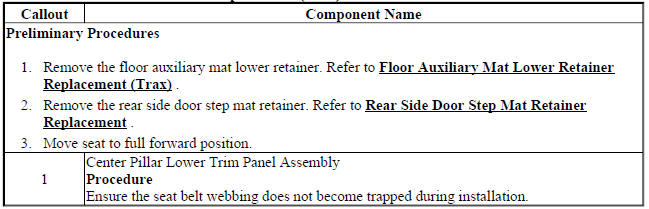
CENTER PILLAR LOWER TRIM PANEL REPLACEMENT (ENCORE)

Fig. 26: Center Pillar Lower Trim Panel
Center Pillar Lower Trim Panel Replacement (Encore)

CENTER PILLAR LOWER TRIM PANEL REPLACEMENT (Encore)

Fig. 27: Center Pillar Lower Trim Panel
Center Pillar Lower Trim Panel Replacement (Encore)
READ NEXT:
 Body lock pillar upper trim panel replacement
Fig. 28: Body Lock Pillar Upper Trim Panel
Body Lock Pillar Upper Trim Panel Replacement
QUARTER LOWER REAR TRIM PANEL REPLACEMENT
Fig. 29: Quarter Lower Rear Trim Panel
Quarter Lower Rear Trim
Luggage shade replacement (encore)
Fig. 38: Luggage Shade
Luggage Shade Replacement (Encore)
LUGGAGE SHADE REPLACEMENT (Encore)
Fig. 39: Luggage Shade
Luggage Shade Replacement (Encore)
LUGGAGE SHADE PIVOT REPLACEMENT (BODY SID
SEE MORE:
Interior Mirrors
Interior Rearview Mirrors
Adjust the rearview mirror for a clear
view of the area behind your
vehicle.
If equipped with OnStar, the vehicle
may have three control buttons at
the bottom of the mirror. See OnStar
Overview
To avoid accidental OnStar calls,
clean the mirror with the ignition off.
Do n
Climate Control Systems
The heating, cooling, defrosting, and ventilation for the vehicle can be
controlled with this system.
Temperature Control
Air Delivery Modes
Fan Control
Defrost
Rear Window Defogger
Air Conditioning
Recirculation
The following are climate control
settings that use more fuel:
Defro
